Microsoft Certified IT Professional (MCITP) - setup lab
This article is the initial guide for the Microsoft Certified IT Professional (MCITP) - setup lab that I created in order to prepare for Microsoft exams. Find below the path I took and the independent labs I created to test and learn Microsoft products, and finally obtain my the following Microsoft Certifications:
70-643 Microsoft Exam Setup lab - Server 2008 R2 Applications Infrastructure
70-642 Microsoft Exam Setup lab - Server 2008 R2 Network Infrastructure
70-410 Microsoft Exam Setup lab - Server 2012 R2 Installing and Configuring
VMware Workstation; in order to setup your lap, you need to have VMware Workstation installed on your computer, download a trial from VMware if needed. I supposed you already have a preferred "Management PC", normally running Windows 7 as a Virtual Machine on your physical computer. If you don't have one, create such VM, install Windows 7 on it and then get the Remote Server Administration Tools for Windows 7 with Service Pack 1 tools, and install them on your Management PC, get the download from here: http://www.microsoft.com/en-us/download/details.aspx?id=7887 This will allow you to have the Hyper-V Manager console from where we'll manage our VMs
- Step 1: Install Hyper-V 2008 R2 SP1, one Hype-V per Microsoft exam
- Step 2: Configure the Hyper-V VM for your Microsoft exam
- Step 3: Configure the Hyper-V VM storage hard drive
- Step 4: Solve the "access denied" problem
- Step 5: Create the Parent VMs
- Step 6: Set Parent virtual hard drives as Read-Only
Step 1: Install Hyper-V 2008 R2 SP1, one Hype-V per Microsoft exam
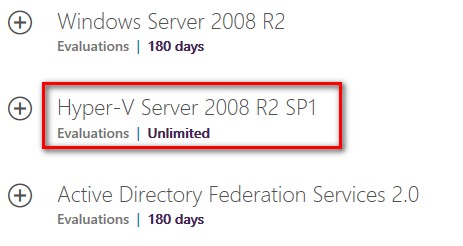
Hyper-V Server 2008 R2 SP1; you can get this Operating System free (well, not exactly free, but the product is licensed for 135 years) from Microsoft. Download a copy of the OS from here http://www.microsoft.com/en-us/evalcenter/evaluate-hyper-v-server-2008-r2-sp1 and install it as a VM on your VMware Workstation, call this VM according to the Microsoft exam number you want to test for.
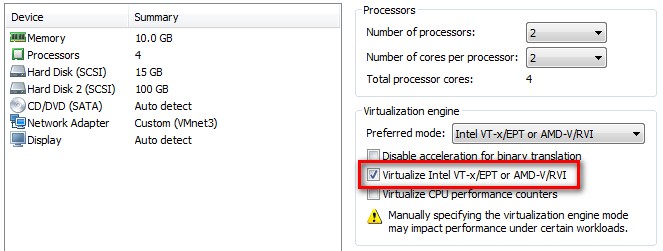
Using VMware Workstation, create a Windows Server 2008 R2 x64 with 15GB on the C:\ drive (just for the Operating System) and an additional 100GB for the V:\ drive on a separate virtual drive. Allocated 10GB of RAM to it, 4vCPUs and one network card attached to a virtual network of your choice, but able to communicate with your Mgmt PC. Most important, don't forget to tick the option "Virtualize Intel VT-x/EPT or AMD-V/RVI" on the Processors settings to emulate a physical CPU, otherwise Hyper-V will not install.
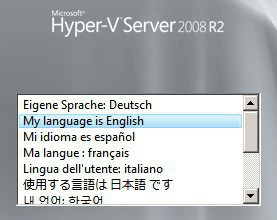
During the installation, select your language of choice.... useful only during the installation, as after this there will be GUI no more. I don't get it really, if you happens to choose Chinese, will the powershell command have to be entered on mandarin? lol
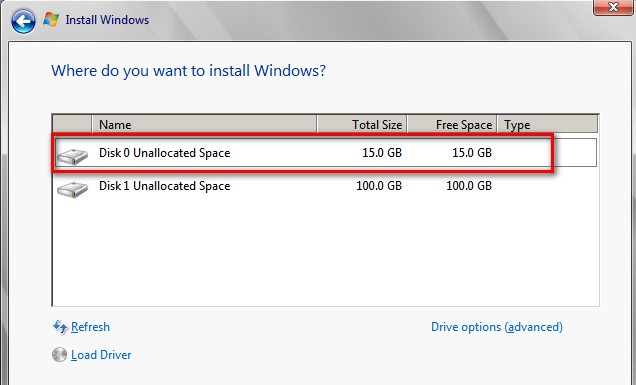
Install Hyper-V 2008 R2 SP1 in the drive with 15GB
After the installation, install the VMware Tools and then shutdown, and that's it, we are ready to configure this VM
Step 2: Configure the Hyper-V VM for your Microsoft exam
It is nice to notice that, on this version of Windows, the command sconfig runs automatically. Using that utility, perform the following on the VM:
- Change the workgroup name to "Nazaudy" (or your preferred choice network)
- Change the computer name to the name of your Microsoft exam, on the example below "70-643"
- Add the local Administrator of the MgmtPC that you want to use to manage this VM
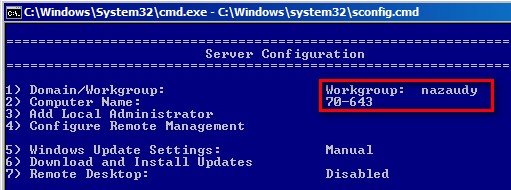
Then visit Remote Management and click on:
- Enable Windows Powershell, otherwise we just cannot manage this core server
- Allow Server Manager Remote Management
- Allow MMC Remote Management

Then allow Remote Desktop, option 7

After that, set an IP address. I gave to this VM 10.10.10.2/24 and test it to ensure it can ping our MgmtPC, which I gave the IP of 10.10.10.1. Notice though that you will not be able to ping the Hyper-V from the MgmtPC, and this is because the firewall ports are blocked on the MgmtPC
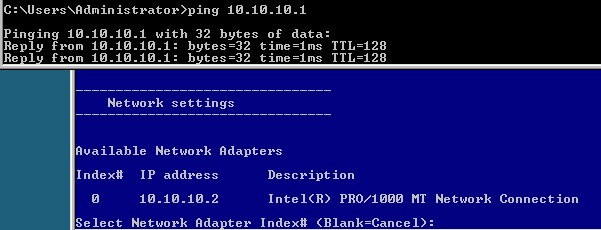
I really don't understand why Microsoft have done that, in spite of us enabling Remote Management the Hyper-V server still cannot be managed from the MgmtPc using the Hyper-V console until the firewall is disable, so go ahead and run this command on the server
netsh advfirewall set allprofiles state offThen, when checking the Windows firewall settings on the Hyper-V you'll notice that the status is OFF
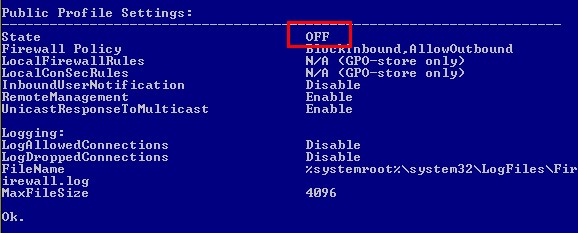
Now that we can RDP to the Hyper-V from our MgmtPC, is time to configure the 100GB drive with the letter V:\
One last step, if you get the error "Cannot connect to the RPC service on computer "our-hyper-v". Make sure your RPC service is running", ensure that the same username + password that you use to logon to your MgmtPC are using to logon to the Hyper-V, once you add it to the domain this problem will disappear

Also, ensure the correct name of the server appears on the left-hand side under "Hyper-V Manager", if you get a different name other than the server, check your DNS settings, flush the cache or something, the names must match, see below the picture that I have of sconfig running in the background over RDP while at front the local Hyper-V Manager console open:

Step 3: Configure the Hyper-V VM storage hard drive
I know, I know, a long way for this Use Hyper-V for Microsoft Certified IT Professional (MCITP) - setup lab, but don't give up! Remember that we added an additional 100GB to this VM? Right, now we need to configure that additional drive to host our Virtual Machines and Virtual Disks on it.
In theory we can do this on two ways, but in practicality only one way is viable:
A) Starting the Virtual Disk Service on the Hyper-V server by typing net start "Virtual disk" but this is a waste of time and this service keep on stopping every time we open the Disk Management administration from another computer
B) Or we can try to configure the additional 100GB drive using the diskpart command, which is what we'll do here ;-)
1.- First of all, get into the diskpart command and run the line list disk to ensure all the disk are online. If the disk is not online, very simple, just select it and then type online disk

2.- Then select Disk 1 and run create partition primary to create a partition
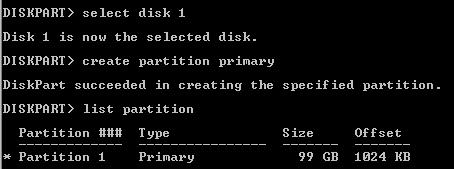
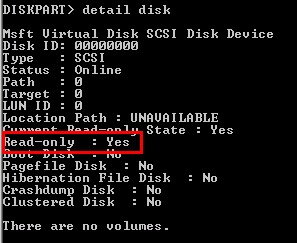
3.- If you encounter an error saying that the disk is read-only, type detail disk to view the disk properties first. If the disk appears as read-only, type the command attrib disk clear readonly
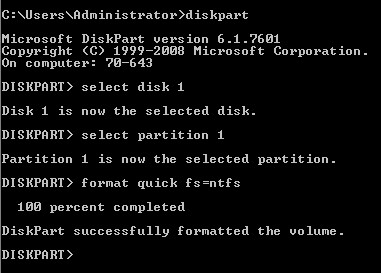
4.- Select the partition and issue the command format quick fs=ntfs
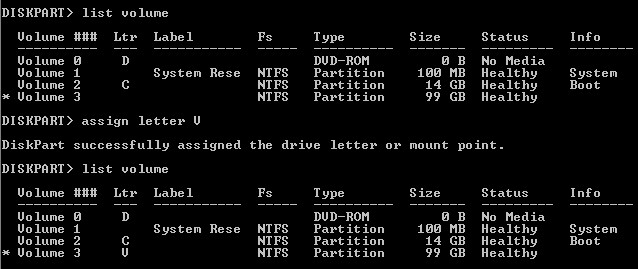
5.- Assign the drive letter V:\ by running assign letter=V
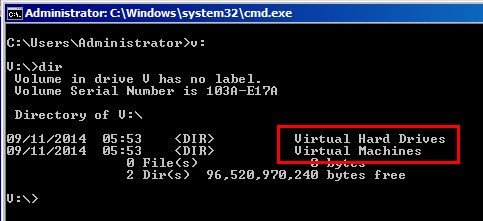
6.- Now, create two directories on the V:\ drive called "Virtual Machines" and "Virtual Hard Drives"
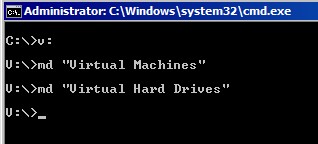
7.- And finally, run dir and check that directories have been created
Step 4: Solve the "access denied" problem
1.- Move now to our MgmtPC and fire up the Hyper-V Manager console from there, right-click the main node and select "Connect to Server...", then type the IP address of our Hyper-V VM and click on OK

2.- You will notice that the name of the VM will be automatically populated, but hey, it will throw up this obscure error message, meaning that we cannot manage the Hyper-V VM completely from our MgmtPC: Access denied: Unable to establish communication between 'server' and 'client'

3.- To solve this problem (which at first looks that is generated by the Hyper-V, not allowing access to our MgmtPC) we actually have to make some configuration changes to our MgmtPC. Go to your MgmtPC C:\ drive and open the dcomcnfg.exe found under C:\Windows\System32

4.- Expand the Component Services and then right-click on My Computer to open its Properties
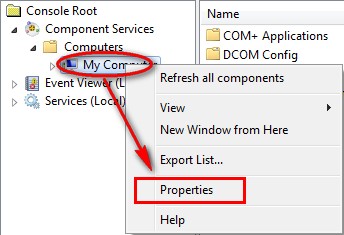
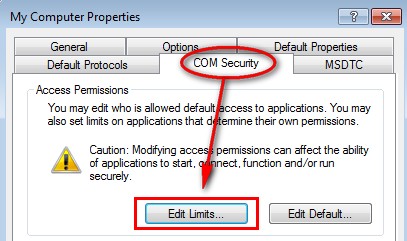
5.- Visit the COM Security tab, and click on "Edit Limits" under the Access Permissions
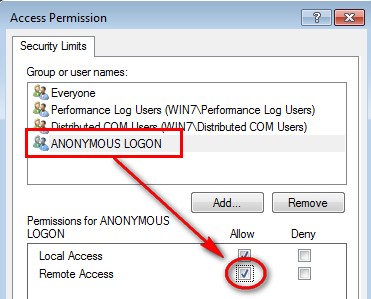
6.- Highlight "ANONYMOUS LOGON" and ensure the Remote Access checkbox is set to Allow
7.- Click OK and close all the windows. Now open Hyper-V Manager and connect to our Hyper-V VM, notice that now we can connect and be able to manage the VMs on our Hyper-V without problems

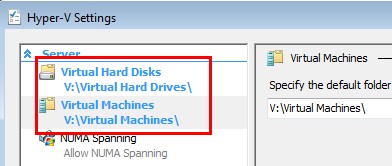
8.- Using Hyper-V manager, visit the Hyper-V settings and use the V:\ drive for storage of both VMs and VHDs directories instead of the default C:\ drive
8.- And finally, visit the "Virtual Network Manager" and add an external network to the Hyper-V, this is so that the VMs can communicate with the host, and so with the MgmtPC from where we'll manage them

9.- On my systsem I've called this network "External LAN"

1.- Fire up the Hyper-V Manager console again and start by creating a new Virtual Machine called "ParentGUI", keeping the virtual drive on the folder called "Virtual Machines" on the additional 100GB drive
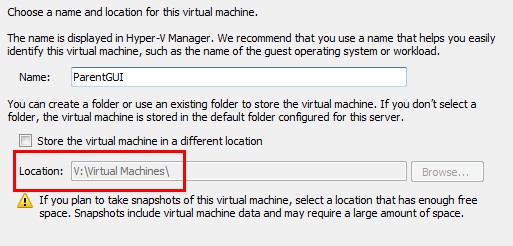
2.- Leave the 512MB assigned memory as default, and connect the VM to the "External LAN network

3.- Let's not go crazy and give the virtual disk a maximum size of only 40GB, then finished choosing to install the Operating System later
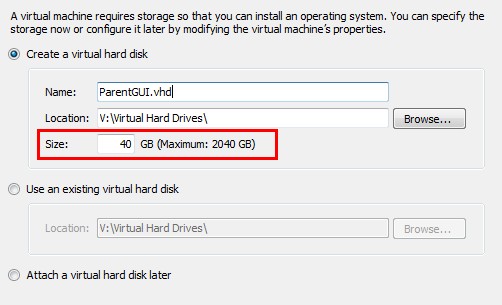
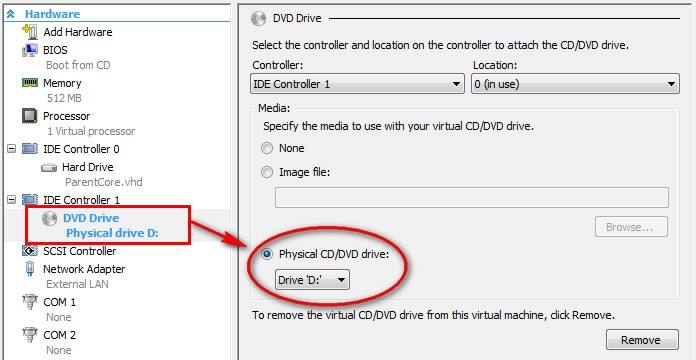
4.- Complete the VM wizard and then install on it the Windows Server Enterprise 2008 R2. To do this you can copy the .iso file into our Hyper-V VM, or better insert the Server 2008 disk into the physical drive of the Hyper-V, and then configure the "ParentGUI" VM to use the Physical drive of the Hypervisor:
5.- At the time of starting the VM to install the OS, you'll be presented with this dreadful error message: "An error occurred while attempting to start the selected virtual machine(s)"
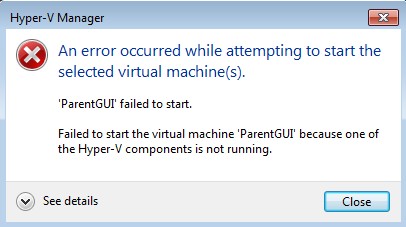
6.- To solve this problem, shutdown our Hyper-V and add this line to the .vmx file:
hypervisor.cpuid.v0 = "FALSE"7.- Once you have installed the Server 2008 R2 Enterprise edition, install the "Hyper-V integration services" on the VM
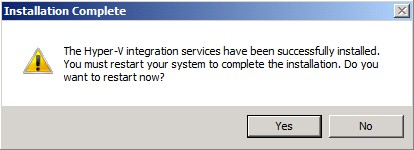
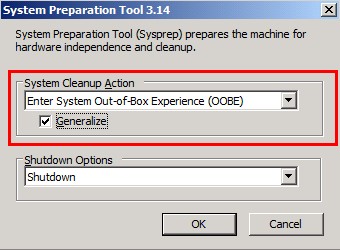
8.- After the reboot, run sysprep.exe from the C:\Windows\System32\sysprep folder, selecting to Shutdown the VM
7.- Finally, once you have created the "ParentGUI" VM, create another Virtual Machine and call it: "ParentCore", then install on it Windows Server 2008 Core Enterprise Edition (we have to know and test the Core edition well).

8.-On the Core VM, install also the Hyper-V Integrated Services and run sysprep.exe as we gave done with the GUI. And this is it; we have now configured two parent virtual disks that are ready to create differencing disks
Step 6: Set Parent virtual hard drives as Read-Only
Once you have both VMs shutdown (the ParentGUI and the ParentCore), logon to our Hypervisor and set the .vhd drives that we have created as Read-Only by running attrib +R
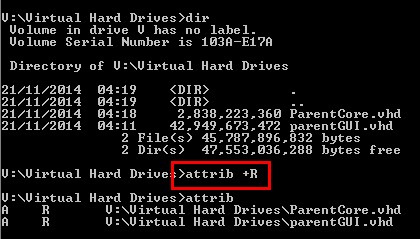
To end this setup, shutdown our HyperVisor and create a snapshot of it, or better a clone so you can use it for different Microsoft Exams. Good luck on exploring the 70-6xx world! Have a look at my other Microsoft articles in the "Articles - Category" left-pane section of my blog if you have enjoyed this article about Use Hyper-V for Microsoft Certified IT Professional (MCITP) - setup lab
Thank you!
East Finchley, London, 21 November 2014
References
Disable Windows firewall from command line. Thanks to Sitaram Pamarthi for this great article about Windows 2008 core firewall: http://techibee.com/windows-2008/disable-windows-firewall-from-command-line/1043
Hyper-V Server: Installing, Configuring and Troubleshooting. Credits to Augusto Alvarez for this fabulous blog about troubleshooting Hyper-V installation: http://blogs.southworks.net/aalvarez/2008/11/15/hyper-v-server-first-steps-and-troubleshooting/
Assign, change or remove a drive letter. TechNet good stuff about how to use DiskPart: http://technet.microsoft.com/en-gb/library/cc757491(v=ws.10).aspx
Windows Server 2008 R2: Survival Guide. From TechNet again, the Windows Server 2008 R2 Survival Guide: http://social.technet.microsoft.com/wiki/contents/articles/357.windows-server-2008-r2-survival-guide.aspx
TechNet Gallery - resources for IT professionals. How did you do that? watch TechNet videos to get the answer https://gallery.technet.microsoft.com/?CR_CC=200438481
Determine if your processor supports Hardware Virtualization; you should know by heart, but in case download the SecurAble utility from here: https://www.grc.com/securable.htm
My Favorities IT websites; find below the ones I visit the most:
- MCPmag.com; great stuff on PowerShell and awesome WhitePapers
- TechSpot; keep yourself updated with the current news in the IT industry
- MicrosoftTechNet; the almighty TechNet
- The Register; if checked on a Friday, it sets the mood for the the weekend
Comments powered by CComment