Lab Setup for Microsoft Exam 70-643
This lab setup for Microsoft Exam 70-643 Applications Infrastructure, Configuring will test you in the following topics of the Windows Server 2008 R2 Operating System:
- Deploying Server (28%) [Windows Deployment Services, Windows Activation, Hyper-V, High Availability]
- Configuring Remote Desktop Services (26%) [Session Host, RD Gateway, RD Web, Connection Broker, etc.]
- Configuring Web Services Infrastructure (25%) [IIS, FTP, SMTP, SSL, authentication and authorization]
- Configuring Network Application Services (21%) [Media Services, Digital Right Management, SharePoint e-mail]
How do you prepare your environment for this exam? How many VMs do you need to setup in order to have a practical out-of-production-servers hands-on? Well, Microsoft doesn't tell and I'm no one to tell you what to do, but on the sections below I show you how I've done it
For Failover Clustering and SharePoint, please visit this other related page: Exam 70-643; Failover Clustering
Step 1: Create your Forest Root Domain Controller (FRDC) + Hyper-V tips
1.- Launch the wizard on Hyper-V Manager to create a new Hard Drive, and create a differencing disk called "DC01" based on the "ParentGUI" hard disk
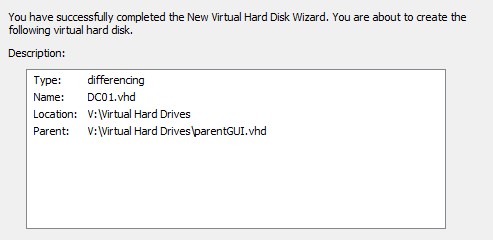
2.- Create a VM called "DC01" using the differencing disk that we have just created:
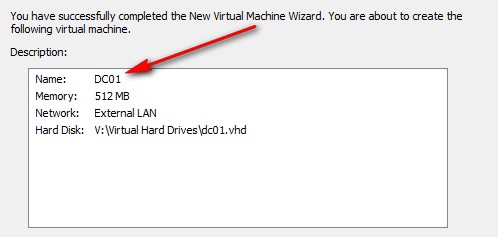
3.- Once you have the VM running, set and IP address according to the section Table of IP addresses found below, then add the role "Active Directory Domain Services", run dcpromo.exe to create a domain called ms643.internal and also install the role "Active Directory Certificate Services (Certification Authority)" and configure the DHCP service with a scope of, let's say 10.10.10.100 to 120 all on \24. These are the roles and features that should be on your Domain Controller before proceeding:
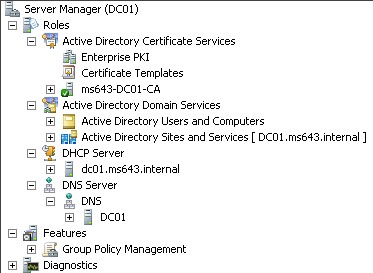
4.-Now locally logon to your 70-643 Hyper-V and add the server to the Domain, this is to ensure we can manage the Hyper-V (it will let us authenticate properly) from within the domain we have just created. Ensure the DNS setting of the Hyper-V server is pointing to our DC, otherwise the Hyper-V will not be able to find it. And also, configure the DC now to always start-up whenever the Hyper-V starts:
- Ensure the "vds" service is started on the Hyper-V
- Then, on both servers (DC and Hyper-V) run this command: netsh advfirewall firewall set rule group=”Remote Volume Management” new enable=yes This will enable you to access the Hyper-V Disk Management from the DC
- On the DC, install the feature "Remote Server Administrative Tools > Hyper-V" so you get access to the Hyper-V manager
5. And finally, edit the Default Domain Policy and apply the settings recommended here: http://www.nazaudy.com/Technology/VMware50/10-DC-on-vSphere.html
Stuff you can do to learn Hyper-V:
- Create a parent disk and then a differencing disk from it, then create VMs based on the differencing disks and then rename/delete the parent disk, how do you fix it? ;-)
- Export a VM and then import it on another host, with or without a snapshot taken?
- Add the feature Desktop Experience. Change the desktop background of a VM as you create snapshots of it, can you go up and down the snapshots?
Stuff that is good to know about Hyper-V:
The tool "Inspect Disk" is purely informative; the tool "Edit disk" allows you to compact, convert (from dynamically to fixed, the other way around you can't), expand or (applicable only to differencing disk) merge (to a parent or to a new one) and reconnect
Wizards: during the "New > Virtual Machine..." you can only create a dynamically expanded disk, while during the "New > Hard Disk..." you can create a fixed, dynamically or differencing disk, with the option (applicable only to fixed and dynamically disks) of copying the contents of a physical disk to the virtual disk to are about to create
Single-Sign-On (SSO); to pass your local credentials to your Remote Desktop Server enable the GP entry in Computer Configuration > Administrative Templates > System > Credentials Delegation
Dynamic Memory Allocation, which balances memory among VMs on the Hyper-V, is only supported on Windows Server 2008 R2 with Service Pack 1 (SP1).
To install Hyper-V on a core server (remember that Microsoft is depreciating the ocsetup.exe command):
- start /w ocsetup.exe Microsoft-Hyper-V (work on Windows Server 2008 and 2008 R2)
- dism /online /enable-feature /featurename:Microsoft-Hyper-V (only works on 2008 R2)
Other commands that are useful to know in relation to Server Core: dism /online /enable-feature:Multipathlo [enable the Microsoft Multipath for attached mass storage)
Stuff that is good to know about Windows Storage:
First of all, create a new VM called "RAID" and install an OS from the WDS on it, then add a few virtual hard drives to it and deep learn the commands associated with creating, deleting and modifying the hard drives; use the utility diskpart to do the following:
- Convert basic disk to dynamic, and partitions to volumes
- Create a delete simple, striped, spanned, mirrored and raid-5 volumes
- Remove or break remove, extend volume and repair raid
Basic disks are divided into partitions while dynamic disks are divided into volumes, a volume can be on more than one partition; a LUN is similar to a volume in that it is a logical representation of a disk drive which is a part of a storage array;
Also, don't forget about the other utility associated to RAIDs, diskraid, get to know it too!
MBR partition tables only support up to 2TB hard drives; Windows Server 2008 R2 cannot boot from a GPT partition unless it is based on the Extensible Firmware Interface (EFI)
Okay, let's have a quick look at the type of disk configurations most commonly used. For a good insight of the types of RAID I recommend a great article at Lascon Storage: http://www.lascon.co.uk/hwd-raid.php
- RAID-0 (single striped set) is where data is divided into blocks that are disturbed sequentially across all the drives in the set (maximum of 32 disks), very fast read and write performance (no parity involved) but hey, no fault tolerance
- RAID-1: (disk mirror), the only way in which an OS partition can be protected; performance is good but, hey, it cost as you are virtually not using one whole drive until failure occurs
- RAID-5; (disk striping with parity) faster to read but slower to write (good-out, bad-in), good for databases
- RAID 0+1; this are two stripes that are mirrored
- RAID 10: one stripe of two mirrors
- RAID 6: parity that supports 2 hard drives failures
Mount Points surpass the limitation of 26 drive letters, by mounting a volume into an empty folder; this is an added security if you don't want anybody to access that mounted drive by a letter (would be hidden under My Computer)
Microsoft Drive Specific Module (DSM) is a driver that communicates with storage devices such as iSCSI, Fibre Channel or SAS
Microsoft built-in iSCSI initiator has a CPU overhead associated, and obviously is not recommended on production environments, but hey, but a charm for testing!
The purpose of iSNS (Internet Storage Name Service) is to help find available targets on a large iSCSI network
Below are the xcopy command popular switches:
- xcopy /T (creates the sTructure only, does not copy files or empty folders)
- xcopy /E (copy all folders including Empty ones))
- xcopy /S (copy all folders exScluding the empty ones)
- xcopy /U (copy only files that already exists on destination, from U to U)
- xcopy /I (creates the destInation directory if it does exists)
To create a virtual disk of, let's say 1GB, run this command: diskpart > create vdisk file "C:\winhd.vhd" maximum=1000 type=expandeable" and then run "diskpart > attach vdisk" and finally to initialize it run "diskpart > convert mbr"
Step 2: Windows Deployment Services (WDS) + Microsoft Activation tips
1.- Create our Windows Deployment Services VM, called WDS01, and install the WDS role on it, then import some 64bit images to it, on this example I imported the images for Windows Server 2008 R2 Enterprise, Win7 Pro and Windows 8.1 Enterprise Evaluation

2.- Go ahead and install the Windows Automated Installation Kit (AIK) on our WDS server (insert the DVD on the Hyper-V and then modify the setting of the VM to choose the physical drive from the Hyper-V), then open the Windows System Image Manager (Windows SIM) and create a new answer file called autounattend.xml, adding the component from the Windows 7 Pro .wim file to join the machine to the domain. On this example I'm using 64bit (amd64):
Remember to save the answer file into the folder V:\RemoteInstall\WdsClientUnattend on our WDS server
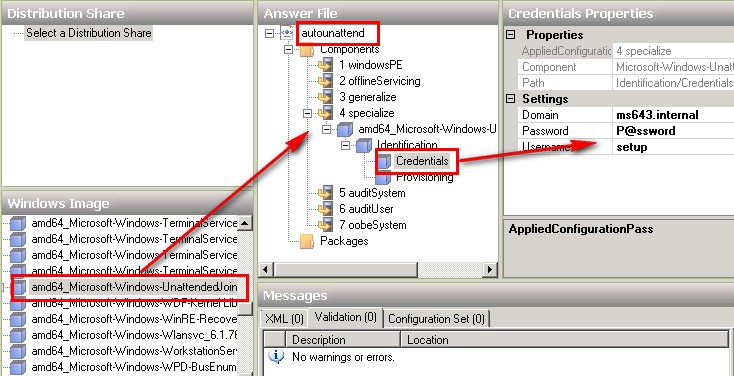
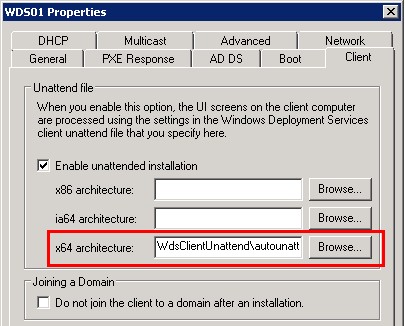
3. Once you have configured the answer file with all the settings that you need, configure an image to use that answer file by visiting the Client tab of our WDS server; notice you can only have an image for 64-bit images and another for 32-bit images
Stuff you can do to learn WDS
- Deploy a fully unattended image of both win7 and server 2008 R2
- Mount a .wim image using imagex
- Explore extensively the command wdsutil, and use it to add images to the server, etc; with this tool you can use powerful commands like: wdsutil /initialize-server /reminst:path\foldername
- wdsutil /set-server /answerclients:all
- wdsutil /set-server /answerclients:known
- wdsutil /set-server /useDHCPPorts:no /DHCPoption60:yes
- wdsutl /add-image /imgefile:D:\sources\install.wim /InstallType:install
- Use the bcdedit (Boot Configuration Data) to edit the boot loader
Stuff that is good to know about WDS
WIM are file-based and not sector-base, meaning they are editable, hardware independent and with a XML based catalogue
WIM images cannot be mixed between architectures, 32bit for 32bit only and 64bit for 64bit only (except when using IFM to create a RODC from our DC)
If WDS and DHCP are on the same VM, visit the DHCP tab and configure WDS for not to use port UDP 67
To run from network location, you can do setup.exe /unattend:myAutounattendFile.xml
Use the command imagex /apply myimage.win 1 c: to apply an image to a c:\ drive. The answer file for that installation should be kept on C:\Windows\Panther\unattend
WDS cannot be installed on Server Core
WDS can have a maximum of 13 boot images
To add a .vhd image to WDS, use this command: wdsutil /Verbose /Progress /Add-Image /ImageFile:"C:\clientimage.vhd" /Server:MyWDSServer /ImageType:install /ImageGroup:"MyInstallGroup"
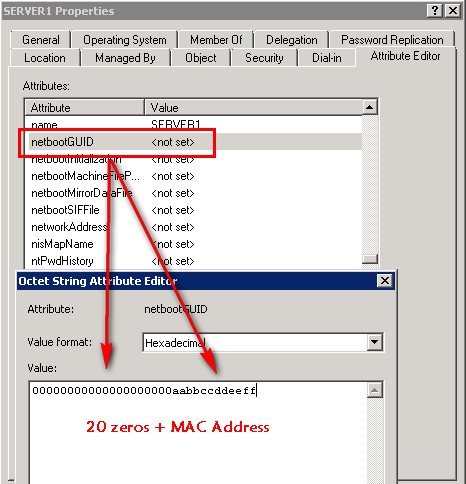
To pre-stage a computer on Windows Server 2008 R2, first of all got to the AD Console and select View > Advance Features, then create the computer and edit its properties, then add the MAC address as illustrated
To create a Windows Discovery Boot CD, do as follows:
1.- Import a boot image (from the source folder of a Windows Vista/7 DVD) to the Boot Image folder on the WDS console, then right-click on the image you have just imported and launch the "Create Discover Image..." wizard
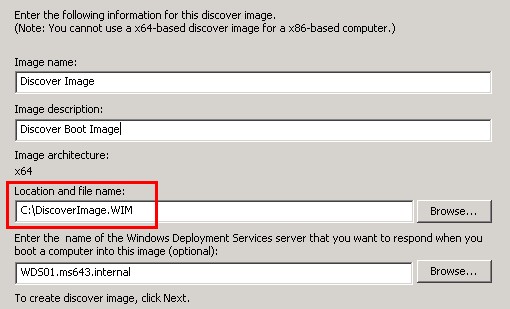
2.- Then, create a 64-bit WindowsPE bootable disk by issue the command copype.cmd amd64 c:\WinPEdisk from the Windows AIK command prompt. After done that, copy the "DiscoverImage.wim" file that you created earlier and pasted into the C:\WinPEdisk\ISO\sources folder, and rename it to be called "boot.wim"

3.- Then, visit the folder "C:\Program Files\Windows AIK\Tools\amd64" and copy the imagex to the root of the "C:\WinPEdisk" folder, this will allow us to have this awesome tool (imagex) on the disk after we created so we can troubleshoot systems
4.- And finally, issue the command oscdimg to create a .iso from the folder that you choose:
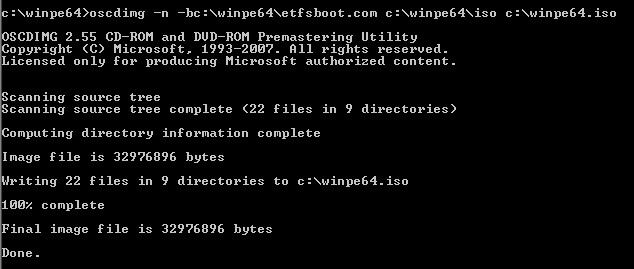
5.- That will create a Discovery Boot disk from which you can boot a machine and connect to the WDS server configured on the image and install an OS on the booted client from it
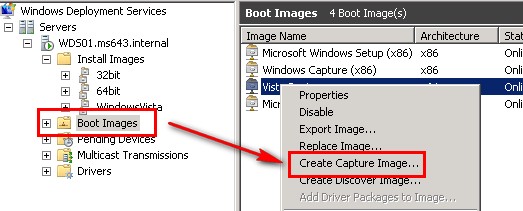
To create a "Capture" image, right click a boot image on the WDS and select the wizard "Create Capture Image..." This will create a capture image from which you can choose to boot after pressing F12 on the 'pristine' machine, uploading the image of the machine with all drives, etc. to the WDS server; obviously, don't forget to use sysprep > generalize before capturing the image of that machine
Stuff that is good to know about Microsoft Windows Activation
Be aware, a KMS host installed on a Windows Vista can only activate Windows Vista clients
A KMS server uses port TCP 1688 to communicate with Microsoft and activate clients
Apart from the OEM (e.g. buy computer from DELL already activated) or Retail (e.g. buy OS from amazon and you need to activated) there is the Volume activation that can be summarised as this:
- MAK (Multiple Activation Key), once activated the Windows will be activated forever or until 3 x hardware components changes occur; MAK can be further divided on two types: MAK Independent Activation; you can use the slmgr.vbs or slui.exe tool with direct connection to the Internet
- MAK Proxy Activation; when activating computers without a direct Internet connection, download the VAMT tool from Microsoft and install it on a PC with a direct connection to activate the others
KMS (Key Management System); only works for environments with more than 25 physical computers if you need to activate client Operating Systems (Windows Vista, 7 or 8) or 5 physical computers if you are activating only server Operating Systems (2008 or 2008 R2). Once you insert a KMS key on a server it automatically becomes a KMS Server, remember this though:
- Port 1688 needs to be open for KMS activation
- Add the DNS SRV resource record entry srv_vlmcs._tcp on the DNS server so clients can automatically find the KMS Server using autodiscovery
- KMS clients not activated will attempt to contact a KMS host once every 2 hours
- KMS clients activated will attempt to re-activate every 7 days
- KMS client that fail to re-activate (they try to re-activate every 7 days) will become de-activated after 180 days without contacting the KMS host. So, the big problem will be if the KMS host becomes unavailable for more than 180 days.
Using the VAMT tool, you can export the IIDs (Installation Unique Identifier) to an .xml file for activation on another VAMT server
Most common switches that I use with the slmgr tool:
- slmgr -ipk xxx-xxx- xxx- (allows you to change the product key by entering the 25 digits number)
- slmgr -ato (activate right now)
- slmgr -dli (displays the license info and most important the status)
- slmgr -xpr (displays when the license expires)
Guide: Table of IP Addresses
| No | Server Name | IP Address | Roles and Features |
| 1 | DC01 | 10.10.10.10 | AD Directory Services (+ DNS) AD Certificate Services DHCP F: Group Policy Management F: Remote Server Administration Tools F: Windows System Resource Manager |
| 2 | WDS01 | 10.10.10.11 | Windows Deployment Services Remote Desktop Licensing Server |
| 3 | RAID | 10.10.10.8 | File Server Resource Manager Remote Desktop Connection Broker |
| 4 | WebServer01 | 10.10.10.12 | IIS Windows Media Services (WMS) [10.10.10.13] NLB Cluster [10.10.10.15] F: SMTP Server (mail transfer) |
| 5 | WebServer02 (core based) | 10.10.10.14 | IIS NLB Cluster [10.10.10.15] |
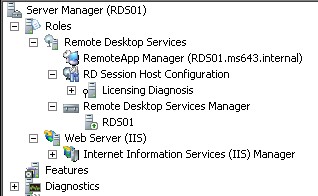
| 6 | RDS01 | 10.10.10.21 | Remote Desktop Session Host F: Desktop Experience F: Windows System Resource Manager |
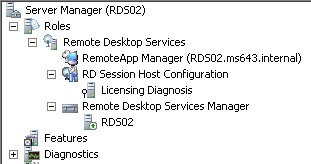
| 7 | RDS02 | 10.10.10.22 | Remote Desktop Session Host F: Windows System Resource Manager |
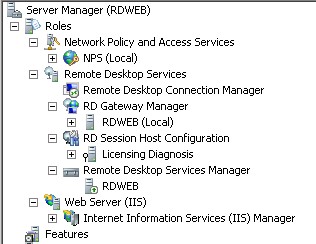
| 8 | RDWeb | 10.10.10.23 | RD Gateway (includes NPS) Remote Desktop Web Access |
Step3: Install the WebServers VMs + Streaming Media Services tips
1.-Create a couple of differencing disk, one for a VM called WebServer01 based on the ParentGUI and another for another VM called WebServer02 based on the ParentCore
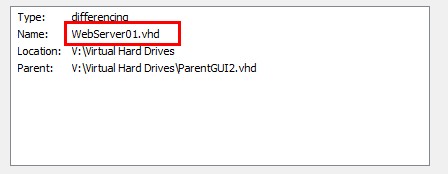
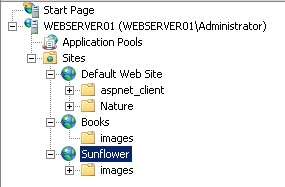
2.- On WebServer01 install of the roles services related to IIS; in addition visit All-Free-Website-Templates and create up to 5 different websites on the server by downloading the templates of your choice; configure appropriate host headings, etc. (edit the bindings in the actions panel so that each site can start and they don't conflict to one another)
3.- On the other hand, on WebServer02, being a Server Core installation, you need to import the IIS module and then copy the templates sites across, good luck with that! ;-) Okay, let me help you out:
- Join the domain: netdom join webserver02 /domain:ms643.internal /UserD:Administrator /PasswordD:*****
- Display the available features in table formatl: Dism /online /get-features /format:table
- Install the IIS role: Dism /online /enable-feature /featurename:WebServerRole
- Install IIS Management Service: Dism /online /enable-feature /featurename:IIS-ManagementService
- Enable Remote Management by changing the key EnableRemoteManagement to 1 in HKLM\Software\Microsoft\WebManagement\Server in the registry
- Finally, start the Web Management Service by running: net start wmsvc
- And run this command to ensure the service start with the next reboot of the core server: sc config wmsvc start= auto
- To display the running services use: sc query
Stuff you can do to learn IIS
Edit the web.config of the sites and see the effects of the changes you make on the features
Using PowerShell you should do:
- Set-ExecutionPolicy RemoteSigned (to enable the execution of scripts)
Stuff that is good to know about IIS
The tool appcmd can only be launched from the C:\Windows\system32\inetsrv path, unless you add it to the System Variables menu
Remember that two SMTP virtual servers cannot have the same IP Address when using the default port 25 (they can have the same name though)
Refer to this table to configure the .NET access policies (ASP.NetTrustLevel):
| Access Security Trust Level set to.... | ...restrict the following: |
| Full | the default trust level, all allowed |
| High |
|
| Medium | Restrict all above plus:
|
| Low | Restrict all above plus:
|
| Minimal | application has only execute permissions |
Advance Logging for IIS is actually an extension that you can install from here: http://www.microsoft.com/web/gallery/install.aspx?appsxml=&appid=AdvancedLogging%3bAdvancedLogging
To enable IIS Manager to the sites of the server, configure the Management Server feature at the server level (the only place it resides anyway) to use this identity credentials

When adding a site using the appcmd command, the two parameters that must be entered are:
- /name:[nameOfTheSite]; the physical path or binding are not essesntial, the appcmd will assume the defaults
- /id:[integer]; specifies the unsigned integer that you want to assign to the web site
Tips about Streaming Media Services
A key is used to decrypt and unlock media packaged content, that key is composed of " license key seed" + "key ID"
Download and install on WebServer01 the KB963697 Microsoft Update Standalone Package (MUS) for Streaming Media Services, more info here: http://support.microsoft.com/en-us/kb/963697
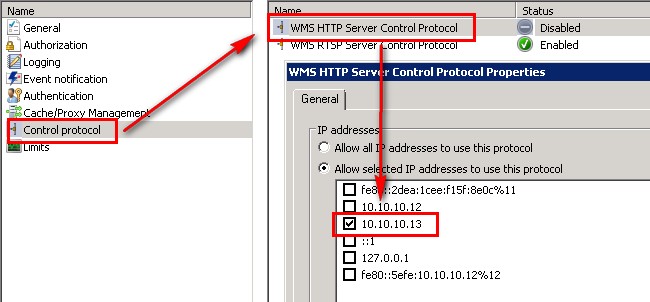
To add an additional IP address for listening to HTTP Streaming, follow this instructions: http://www.iis.net/learn/media/windows-media-services/using-http-for-streaming-and-downloading-from-the-same-computer
If you have bandwith contention when playing videos...
- Enable "Advanced Fast Start", if the user has Windows Media 10 or later, the video will start playing with less initial buffering delay
- Enable "Fast Reconnect", available in Windows Media Player 9 and later
If you have enough bandwith to play videos...
- Enable "Fast Cache", beneficial when the available bandwidth exceeds the requirements of the content
Windows Media Player 6.2 or higher is needed to play packages media files
Step 5: Install the RDS (Remote Desktop Services) VMs
1.-Create 3 differencing VMs from our ParentGUI, and based on that create these 3 different VMs:
| RDS01 | RDS02 | RDS03 |
 |  |  |
Stuff you can do to learn Remote Desktop Services
Install an application on your RDS server by placing/removing the server on the appropriate modes, after the program is installed don't forget to add it to the RemoteApp list, remember:
- change user /install (after running this, go and install the application and make the needed changes to it, like setting preferences, default paths, etc, the changes you made will be captured on the registry)
- change user /execute (once installed, put the server on execute mode so that users can access the application, they will not be able to change the setting you configured on the application while on /install mode)
- change user /query (hello? on which state are we running?)
Deploy a few of the .msi packages created in RDS to one of the client computers you built earlier using WDS
Export packages from one RDS server and import them into another RDS server, so much fun!
Stuff that is good to know about Remote Desktop Services
RD CAPs (Connection Authorizations Policies) are authorization policies that specify who can connect to a RD Gateway, once you have a RD CAP in place, you can create a RD RAPs (Resource Authorization Policy) to establish what the authorized users can access. Both policies must be created when initially configuring a RD Gateway
RD Gateway requires the following to be installed too:
- Feature: RPC over HTTP Proxy
- Role: IIS
- Role: Network Policy and Acccess Services
To fine-tune the bandwith of a RDS server and customise the experience of users, alleviating the issue of having a slow or unresponsive mouse after sending a large print job, change the following values under this key: HKEY_LOCAL_MACHINE_SYSTEM\CurrentControlSet\Services\TermDD
- FlowControlChannelBandwith; default is 30, gives priority to clipboard, file transfers and print job, max is 255
- FlowControlChangePostCompression; this determines wether flow control calculates the bandwidth based on precompression or postcompression bytes, the default value is zero which is precompression
Font Smoothing; If you have a LCD screen, enable ClearType effect and the Window Color and Appearance applet
If the RD RemoteApp server and RD Web Access are on separate boxes, the RD Web Access must be added to the local security group on the RD RemoteApp
A member of a session broker load-balanced group can be placed in drain mode, aka maintenance mode, where users can reconnect to disconnected sessions but no establish new sessions
To prevent a single server from being overwhelmed by new logon requests, RD Session Broker Load Balancing sets a limit of 16 maximum pending logon requests to any one terminal server. The session limit of a RD server can be changed by creating the key UserSessionLimit under [HKEY_LOCAL_MACHINE\SYSTEM\CurrentControlSet\Control\Terminal Server]
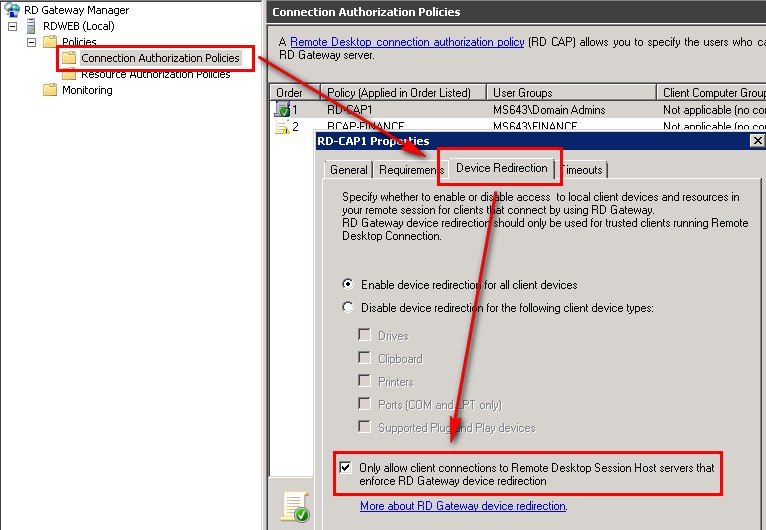
RDC 6.1 is required to connect to RD Web Access, RDC 6.1 is only available on Windows Vista SP1, Windows XP SP3 and Windows Server 2008, of course RDC 7.0 is available on the later versions (Windows 7) and also support RD Web Access. To force users to use RDC 7.0, you should tick the option "Only allow client connection to Remote Desktop Session Hosts server that enforce RD Gateway device redirection" under the CAP policy:
For automatic discover of the licensing server, this has to be installed on a Domain Controller
Issuance report of Per User CALs only support licensing servers that are in a domain
The revocation process only works on Per Device (and up to 20% of device type) and not Per User
Licensing Diagnosis only works when the RD Session Host role is installed, not even from the licensing server you can run the diagnosis unless the RD Session Host service is running

To control which RD licensing server issue licences to which RD Session host, enable the GPO "License server security group" located in "Computer Configuration\Administrative Templates\Windows Components\Remote Desktop Services\RD Licensing" and then add the RD Session host servers to the "Terminal Server Computers" local group of the RD Licensing server
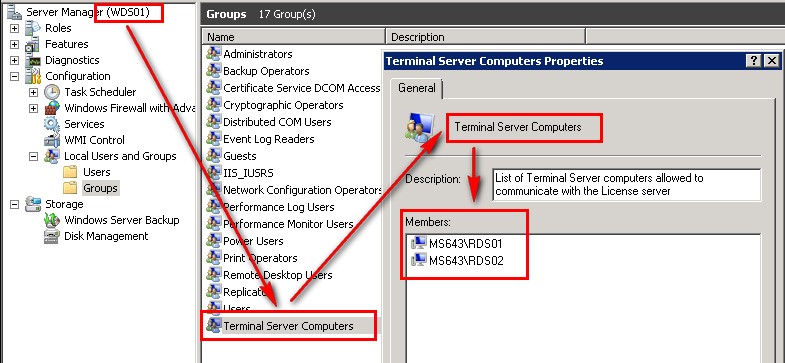
Remote Desktop Services checks for a licensing server in this order:
- First attempt is to contact the license server listed in the Configuration Tool or Group Policies
- Next, will try to contact the license server that is installed on the same box as the RDS
- Next, will try to contact any license server which is published in Active Directory
- Finally, RDS will try to contact a license server installed on Domain Controllers in the domain
If the Dynamic Fair Share Sessions (DFSS) is set on the registry, the policy applied by WSRM is Weighted_Remote_Sessions; this is also the case if the Kernel Resource Manager (KRM) bit is set in the registry
What does TS Session Broker do:
- The Session Broker server ensures users are re-directed to their original session if they get disconnected
- The Session Broker server also enables the balance of session between the RDS servers on a farm
If the RD Web Access server and the RD Session host server holding the RemoteApp are on different servers, we must give access to the RD Web server to display the apps by adding it to the local group "TS Web Access" on the RD Session host
Step 6: Windows System Resource Manager
Windows System Resource Manager is so flipping cool!
Commands that are good to know for Server Core 2008 R2
Just a few random handful commands that are worth mentioning:
cscript sregedit.wsf /AU /4 ; enable automatic updates, if using the /1 it will disable the updates
cscript C:\Windows\System32\Sregedit.wsf /cs 0 ; will enable Remote Access for administrative purposes
London, 15 May 2015
References
Windows 7 Automated Install Settings; huge thanks to Mischa Taylor for this amazing blog: http://misheska.com/blog/2013/07/26/windows-7-automated-install-settings/
Installing and Configuring WDS; lots of thanks to Augusto Alvarez for his great blog: http://blog.augustoalvarez.com.ar/2008/12/12/installing-and-configuring-wds-windows-deployment-services-full-images-deployment-part-iii/
Running Hyper-V in a nested VM; thanks to Andrea Mauro for this great blog: http://vinfrastructure.it/2014/05/running-hyper-v-nested-vm/
Ho to install Roles and Features on Windows Server 2008 R2 Core (Shell); great stuff from Thomas Maurer http://www.thomasmaurer.ch/2010/07/howto-install-roles-and-features-windows-server-2008-r2-core-shell/
Server Core 2008 R2 oclist and ocsetup v.s. dism; nice once from Nady Elkhodary http://www.watchandapply.com/2013/05/server-core-oclist-and-ocsetup-vs-dism.html
Fix "RPC Server is Unavailable" Error in Windows Server 2008 R2 Remote Disk Management; another great article from Petri https://www.petri.com/rpc-server-is-unavailable-error
Installing Windows Server 2012 Core; great initial steps for a shell installation of Microsoft OS system, my thanks to Rand Morimoto, Andrew Abbate, Chris Amaris, Omar Droubi, Michael Noel and Guy Yardeni http://www.informit.com/articles/article.aspx?p=1947698&seqNum=5
Comments powered by CComment