Setup 3CX phone system vs Avaya IP 500
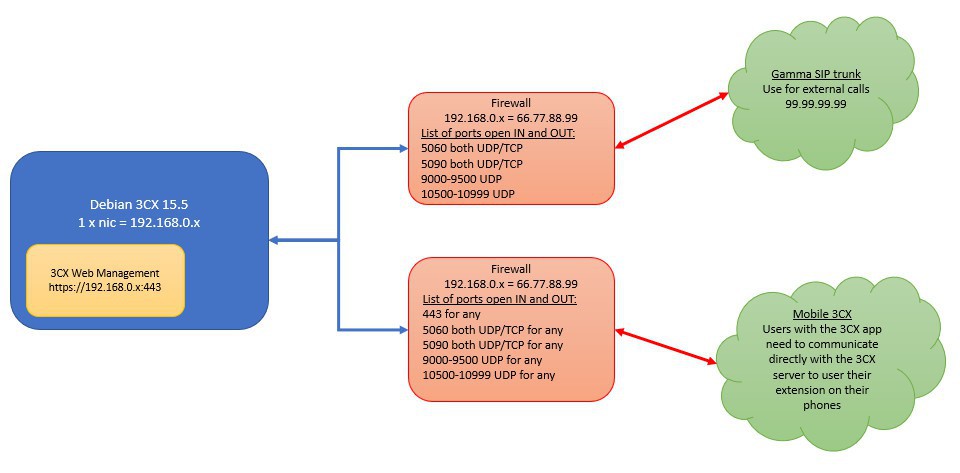
This is how we Setup 3CX phone system vs Avaya IP 500 to ensure that both systems can communicate to one another. We started this project by first of all drawing our configuration:
We need to go through the following steps to complete this project:
- Download the 3CX virtual machine server
- Initial Configuration of 3CX
- Setup a Bridge (SIP) from 3CX to Avaya IP 500
- Setup a Line (SIP) trunk from Avaya IP 500 to 3CX
- Setup the Avaya shortcodes
- Setup 3CX inbound and outbound rules
After this we'll take it a bit further a setup the connection 3CX to Avaya using a SIP trunk, not recommended as it is a lot more complex and complicated than a bridge
- 50. Create a SIP trunk in 3CX
- 51. Create a SIP line in Avaya
- 52. Add the relevant DID extension to the users
- 53. Add inbound rule for the user extension
- 54. Setup the SIP trunk in the Avaya
- 55. Avaya shortcodes for the 3CX SIP trunk
- 56. Tuning the 3CX SIP trunk
To finished off the article, I've added additional tips, hope you find them useful!
- How to turn off Debian Firewall
- How to use your own customise logo for the Yealink phones
- How to create a personal address book for every user
1. Download the 3CX virtual machine server
You can have the 3CX on a Windows VM, but I much prefer to have it on a Linux box, more secure and save you from rebooting for the flipping Windows Update every now and then. We'll install this on a VMware infrastructure, so please visit this link https://www.3cx.com/phone-system/download-links/ and download the Debian for 3CX. These are the specs in which I configured our VM (notice the PHONE network adapter must be connected to the VLAN that carries VoIP traffic in your network infrastructure):
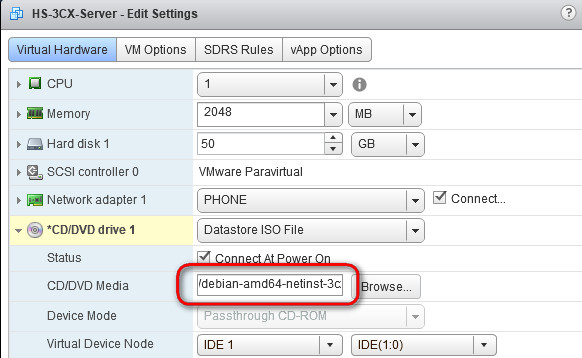
After you boot the VM, you'd be required to enter some details to configure it, these are the details I used for my example:
- IP address for 3CX: 192.168.0.x (private IP)
- Hostname: 3cx
- Local Domain: nazaudy.internal (ensure you have a DNS entry for the name "3cx")
- Language: British UK
- Root password: uptoyou!
- Use the recommended partition disk
- When prompted for 3CX Update Channel use: 3CX Stable 15.5.15502.6 (Install for production use)
- Accept the license agreement: okay!
IMPORTANT NOTE!: Do not install the version 16 if you have a trial license, version 16 (unlike 15.5 or 15) has remove the support for "Bridge", which is essential to have for the 3CX vs Avaya IP500
Just so you know, you need to be connected to the Internet for this installation to be successful, otherwise you'd be presented with this error message:

Once you finished with the VM installation, select the option to run it from the web, and that's it, visit the IP you gave it plus port 5015 to continue the configuration
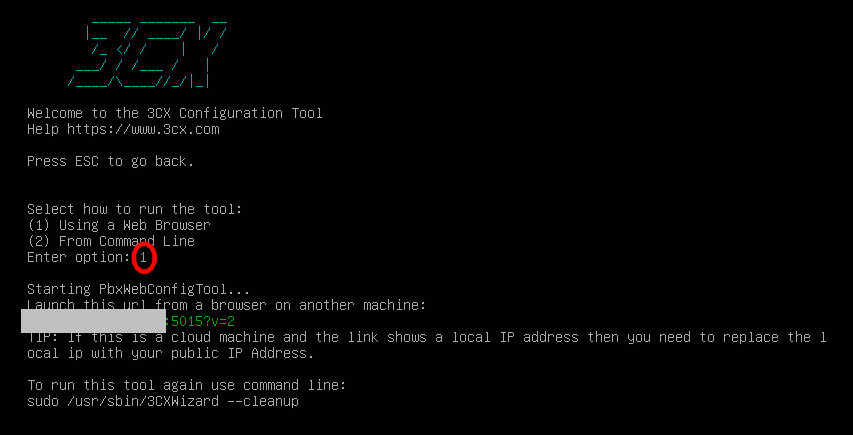
2. Initial Configuration of 3CX
Visit http://192.168.x:5015 and choose the option to "Create new install of 3CX Phone System"
- Insert the license key that you'd have received by registering to https://www.3cx.com/voip-ip-pbx/
- Configure a username/password for the 3CX Management Console (note that the password must be at least 10 characters long)
- Define your "static" public IP and ensure you open the following ports for 3CX on your firewall for that IP address. You need to have a public IP address free and available before hand to assign it to the 3CX, this will allow you to receive calls on your mobile phone
- Choose your phone to be addressed by the FQDN of the linux VM where 3CX is running from (on my example 3cx.nazaudy.internal)
- Select how many digits your extensions will have (on my example I used 3 digits only)
- Enter an admin e-mail address
- Configure SMTP so that 3CX can send you notifications by e-mail
- Select your Country and Time Zone, very important
- Configure the operator Extension
- Use 000 for the extension number
- Use 666 for the voice mail extension number
- Select the countries to which calls can be made to
- Select the language as "UK English Prompts Set"
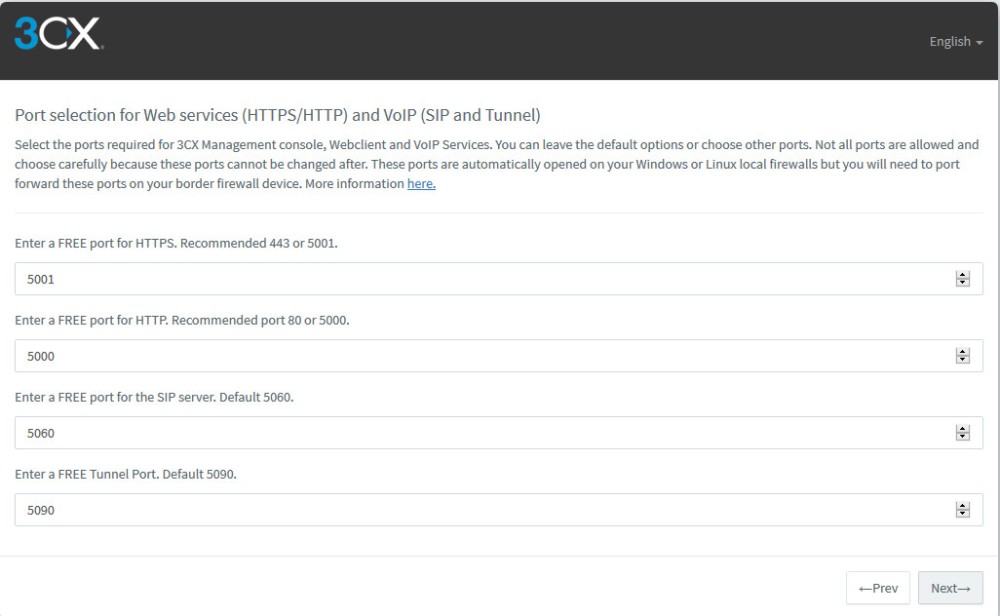
- At this stage you should receive a successful installation message. To manage 3CX moving forward use port 5001 instead: https://192.168.0.x:5001/#/login
3. Setup a Bridge (SIP) from 3CX to Avaya IP 500
Logon to your 3CX and create a new "Bridge" pointing to your Avaya IP 500 (on my example is on the subnet 10.0.x.x), and give it the virtual extension "1000"
In the section "Outbound rule prefix to reach remote 3CX PBX" I have put any string, on this example I put "Call from Avaya Bridge", this is the text that your 3CX app and softphone will display as the CallerID
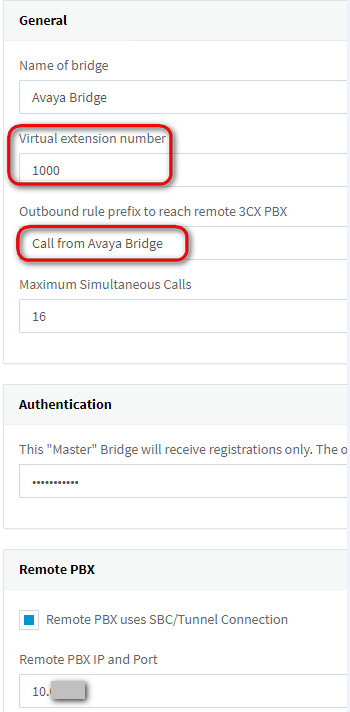
Ensure that on the "Presence" tab you also point to the PBX IP of the Avaya IP 500

Set the "Advanced" tab with these options:
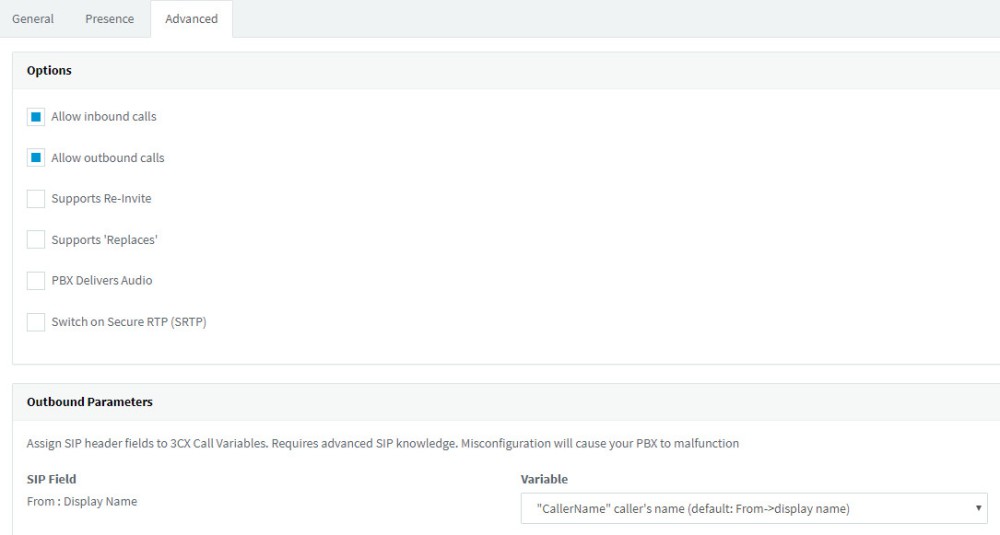
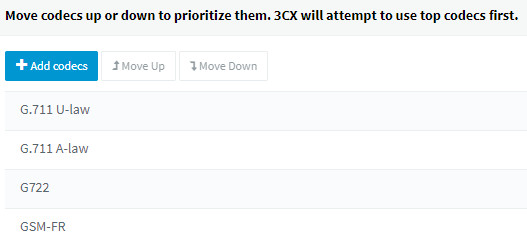
I left the Codec as default, and just so you know those are the one chosen by the bridge:
4. Setup a Line (SIP) from Avaya IP 500 to 3CX
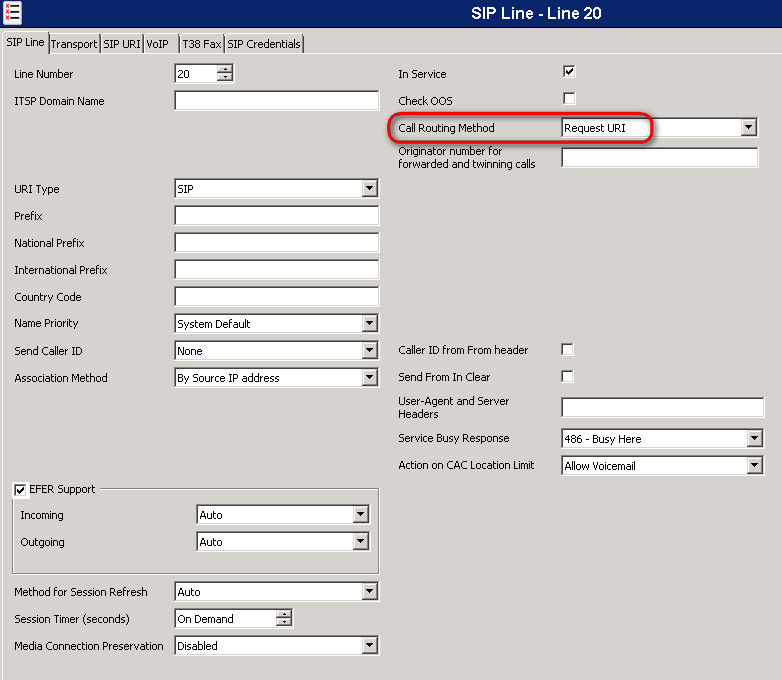
Now visit your Avaya IP 500 and create a new SIP line, on my example I created line number "20"

Ensure the option Call Routing Method is set to "Request URI"
On the transport tab, under the "ITSP Proxy Address", put the IP address of your 3CX, on my example 192.168.0.x (blanked in read on my screenshot below). Notice that the Layer 4 Protocol use is UDP and the port is 5060

Visit the SIP Credentials tab and enter the credentials that you configured on the 3CX Bridge, where the username is the Username/Authentication is the Virtual Extension of the Bridge that you previously created (in my example 1000)
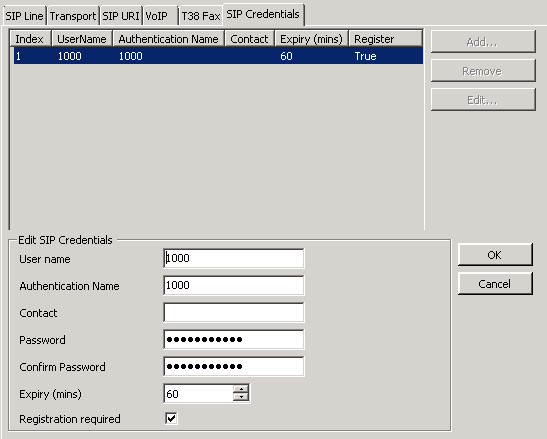
In the SIP URI you need to add 2 x entries, one using the credentials you added:
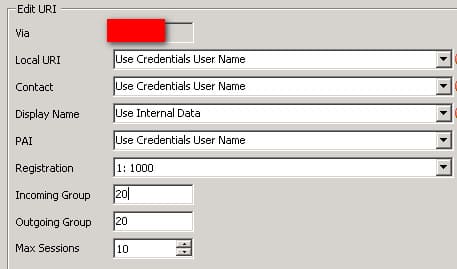
And the other one where the fields are populated with Asterisks (*):
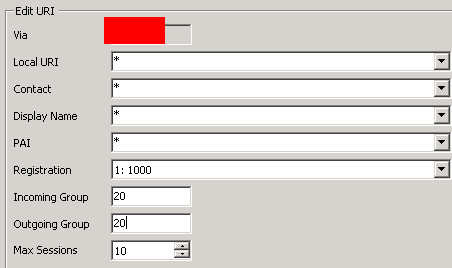
After this configuration, you should have 2 x entries in the SIP URI tab:

Set the VoIP tab as below:

At this stage the Bridge is the 3CX should be displayed in a green status. Visit the Avaya Short Code section and add an entry to dial to 3CX, on our example we would be dialling 8 + the 3CX extension

Add one more shortcode to dial out from the 3CX, for example, our 3CX dials out whenever we press 3, therefore add a code in the Avaya so that when you press 83 + the dialled number (a mobile, lan line, etc) the 3CX will receive the number, will remove the 8 and will send it out using the 3 + the desired number. This is really useful if you Avaya is in the UK and your 3CX is on another country, let's say USA, you will call from UK to lan lines or mobiles in the USA at the local rate, because the Avaya will use the 3CX to dial into the country
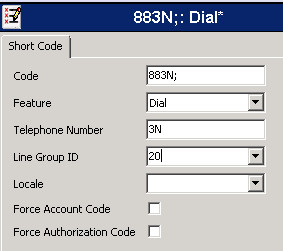
Still on the Avaya, visit the section "Incoming Call Route" and add an entry for line 20, adding an asterisk to the "Incoming Number" field, which basically indicates any number
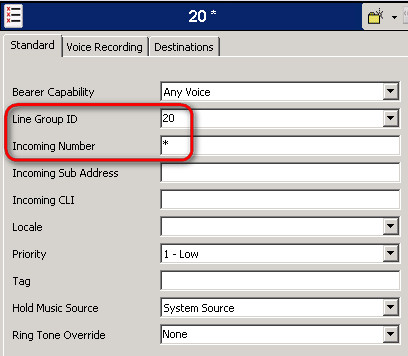
Ensure that the destination of the incoming call by line 20 is set to . (dot), meaning basically any extension at the other end

That would be all the job done in the Avaya, now let's jump to the 3CX
6. Setup 3CX inbound and outbound rules
Let's start by creating an outbound rule so you can call to the Avaya PBX by pressing 8; visit the "Outbound Rules" sections in your 3CX Management Console and create this rule, leaving the length of the numbers as blank, so you can dial to both extensions and outside numbers using the Avaya

That should be all done, and to test your configuration do the following tests:
| 3CX to Avaya | ||
| 8 + [avaya extension] | Will use Line 20 incoming in Avaya | it works! |
| 83 + [mobile] | Will use Line 20 incoming in Avaya | it works! |
| Avaya to 3CX | ||
| 8 + [avaya extension] | Will use Line 20 incoming in Avaya | it works! Will display "Call from Avaya Bridge" |
| 83 + [mobile] | Will use Line 20 incoming in Avaya | it works! Will display your main number associated with the Gamma SIP trunk |
First of all we need to create a extension that will receive all the calls on this trunk that are not matched by a DDI, therefore visit the "Extensions" section of your 3CX and add a new extension, on my example I choose the number 775 and called "SIP trunk user"

Once this is done, visit the "SIP Trunks" section in 3CX and create a new SIP trunk like this, pointing to your Avaya VoIP ip address
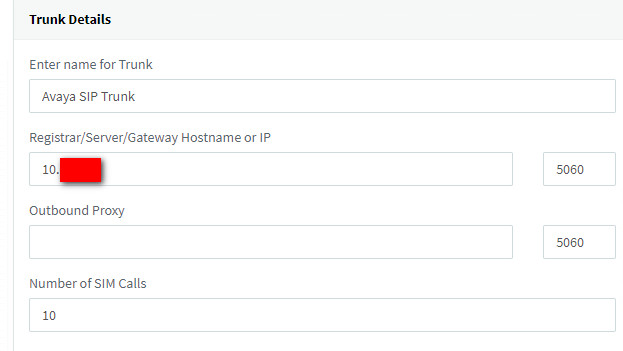
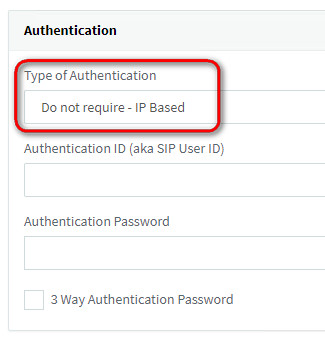
Set the Authentication to "Do no required - IP Based"
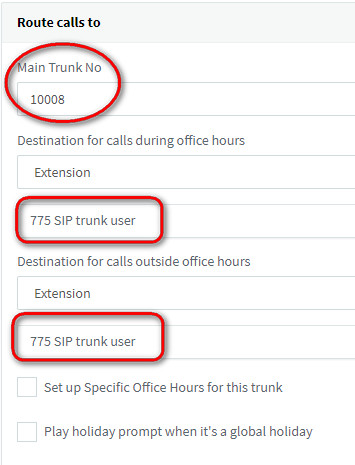
In the section "Route Calls to" set the number 10008 as the main trunk number and configure the extension 775, which will receive all non-matched calls
51. Configure DID extensions in the SIP Trunk
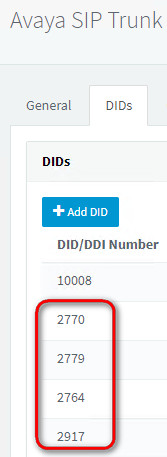
Before we could receive calls in the SIP trunk, configure the "DIDs" tab in the SIP trunk with the extensions that you want to receive the call, if there is no match here then the call will go to the main extension 775 that route the inbound of this trunk.
This SIP trunk is going to receive all the calls starting with the number "2", in other words the Avaya at the other end is going to send the number 2 plus the extension, therefore add the number "2" to any extension you want to configure
52. Add the relevant DID extension to the users
Now visit each of the extensions you added in the trunk and in the tab General > "Direct Inbound Dialing (DID)" enter the extension that correspond to that user, on my example I'm adding extension 2770 to the extension 770

53. Add inbound rule for the user extension
To make it all work, finally add an inbound rule in the 3CX so that all incoming number with "2770" will go the extension 770. This way, if in the future you add another SIP trunk (like on the example below the Madrid SIP trunk), you can first of all welcome the call and then re-directed to the desired destination
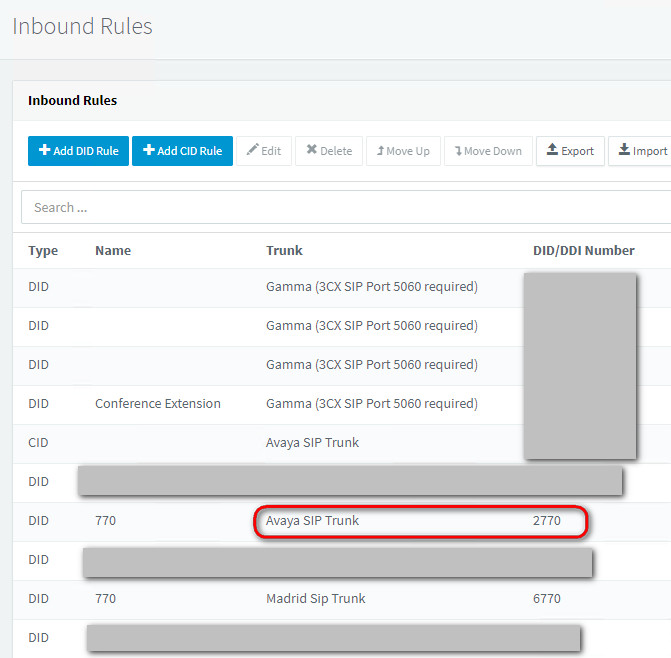
You'll notice that, once you add the rule, the DID extension section will be automatically configured, showing in this example the fact that it will receive calls from both Trunks (Avaya with the 2 and Madrid with the 6), though on this article I'm only covering the SIP trunk with Avaya

54. Setup the SIP trunk in the Avaya
Now we'll need to setup a new SIP line in the Avaya to connect to the SIP Trunk we have done in the 3CX. We previously configured SIP line 20 to match the 3CX bridge (which is the recommended way of doing it), and the first thing we need to do now is to disable that line by unticking the "In service" option and then... guess what? yes, reboot the Avaya...

Once you have done that, create a new SIP line (in my example is line 21) and configure it with these options (all missing tabs are to be the same as line 21, with the exception of the SIP Credentials). do not configure any SIP credentials on line 21
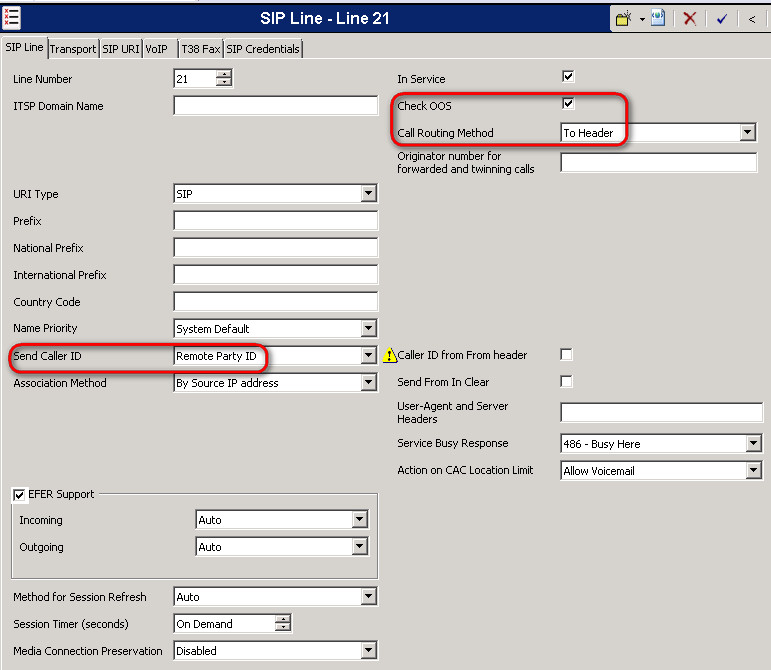
This line will have 2 x SIP URI entries too, but on this occasion the registration will be set to "None" and the contact could be set to anything, but I have chosen to set it to "10008", matching the SIP Trunk number that we gave to the 3CX


55. Avaya shortcodes for the 3CX SIP trunk
Configure this shortcode in the Avaya, so that it will send to the 3CX (as the 3CX expect it) the number 2 + whichever the extension you want to call to
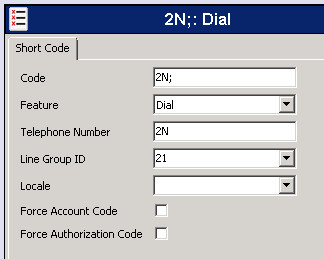
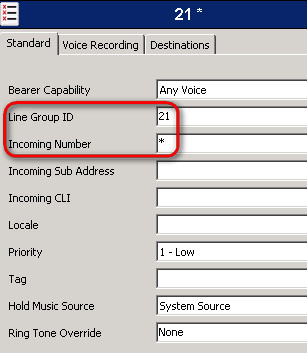
Don't forget to add an incoming rule with the * and . for line 21
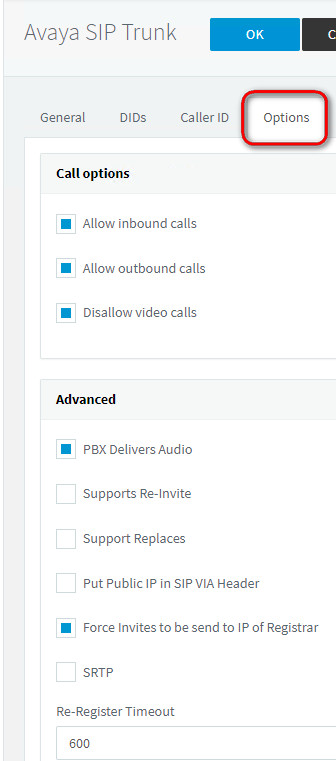
Visit the SIP trunk in the 3CX and ensure it has these settings in the Options tab:
In the "Inbound parameters" tab configure these other options:
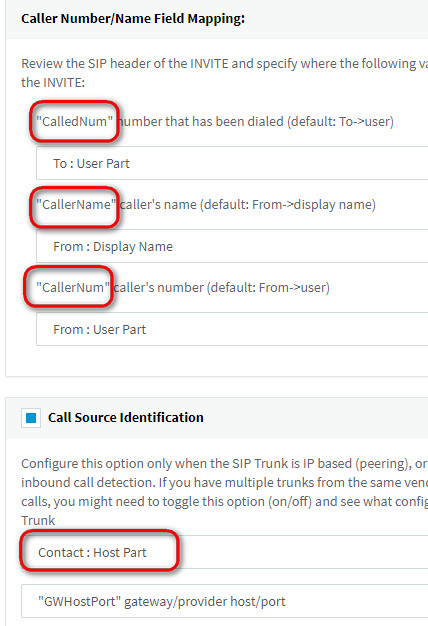
And finally, and hopefully this will display the name of the person calling, visit the "Outbound parameters" tab and configure this option:
![]()

That's all! Thank you for reading. Click on the advert in this article "at the beginning" and let's go for a bear!
London, 2 February 2019
How to turn off Debian Firewall
Run these commands on your 3CX Debian machine to turn off the firewall, this is useful to do ONLY for troubleshooting purposes. Firewalls should always be on
iptables -F
iptables -X
iptables -t nat -F
iptables -t nat -X
iptables -t mangle -F
iptables -t mangle -X
iptables -P INPUT ACCEPT
iptables -P OUTPUT ACCEPT
iptables -P FORWARD ACCEPT
iptables -L ;to test it
On some version you may have to use the new iptables-nft command:
iptables-nft -F
iptables-nft -X
iptables-nft -t nat -F
iptables-nft -t nat -X
iptables-nft -t mangle -F
iptables-nft -t mangle -X
iptables-nft -P INPUT ACCEPT
iptables-nft -P OUTPUT ACCEPT
iptables-nft -P FORWARD ACCEPT
iptables-nft -L
How to use your own customise logo
On your 3CX linux box visit the location var > lib > 3cxpbx > Instance1 > Data > Http > Interface > provisioning > aaxxxbbccxx > logo > and replace the logo that your phone use with your customised one
How to create a personal address book for every user
Modify the template that you are using for the phone to add this entry under the section "Remote Phonebook":
###########################
## Remote phonebook ##
###########################
#Configure the access URL and dispaly name of the remote phonebook. X ranges from 1 to 5.
#remote_phonebook.data.X.url =
#remote_phonebook.data.X.name =
##It enables or disables the phone to perform a remote phone book search when receiving an incoming call.
##0-Disabled,1-Enabled.
##The default value is 0.
features.remote_phonebook.enable = 1
{IF network=LOCALLAN}
remote_phonebook.data.1.url = %%PROVLINKLOCAL%%/ yealink_phonebook.xml
{ELSE}
remote_phonebook.data.1.url = %%PROVLINK%%/ yealink_phonebook.xml
{ENDIF}
remote_phonebook.data.1.name = COMPANY PHONEBOOK
{IF network=LOCALLAN}
remote_phonebook.data.2.url = %%PROVLINKLOCAL%%/%% extension_first_name%%%% extension_last_name%%.xml
{ELSE}
remote_phonebook.data.2.url = %%PROVLINK%%/%% extension_first_name%%%% extension_last_name%%.xml
{ENDIF}
remote_phonebook.data.2.name = PERSONAL PHONEBOOK
##remote_phonebook.data.2.url =
##remote_phonebook.data.2.name =
#Enable or disable the feature key synchronization; 0-Disabled (default), 1-Enabled;
bw.feature_key_sync = 0
Then, visit again the location var > lib > 3cxpbx > Instance1 > Data > Http > Interface > provisioning > aaxxxbbccxx > and create in there the files "NameSurname.xml" with whichever personal phone extensions that you need inside. Don'' forget to re-provision the phone for it to reflect the updates!
London, June 2017
Comments powered by CComment