Limagito and DataDog
This article of Limagito and DataDog is a tutotrial about the integration of these two plaftorms and apps. Let's say that I present you with this scenario:
- You have some FTP servers that are receiving tons and tons of files every single minute from different sources around the world
- You need to distribute those files to other systems where they can analyse the value of those files, discard the not good ones and keep the good ones
- You need to constantly monitor on a screen the flow of traffic from the FTP to the other system
How do you solve this issue? Well, in this tutorial I'll show you how to use a software called Limagito to moves files from A to B and a monitoring software called DataDog
First, head to this link and download the Limagito File Mover software: https://limagito.com/file-mover-downloads/ The version I downloaded was the Stable 2022.8.8.0, doing of course a "Full installation"
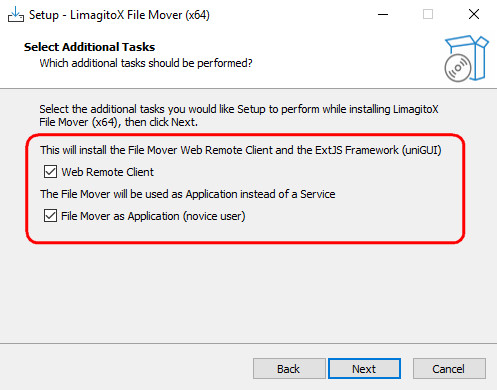
Ensure that you choose both the "File Move as Application" option:

The software comes with 5 different applications that are well described in the "IntroXFM.pdf" file found

Once the software is installed, open the Configuration Tool and import the license that you have previously bought from Limagito.

First of all, open the services.msc snap-in and modify the "LimagitoX" service so that it loads with the local Administrator account

After that, install the service.....

....and then after add the rule to the firewall

Do the same for the Web Remote Server service, so you can manage the application remotely
4. Install the DataDog VM
Our Limagitos are running on Windows Server 2016, so logon to your Datadog free account on each one of them and download the Windows agent:
Enter the API key during the installation process
5. Configure the limagito datadog service
Create a folder under C:\ProgramData\Datadog\conf.d and called "limagitax.d"
Inside that folder, create the following "conf.yaml" file:
logs:
- type: file
path: E:\LimagitoLogs\SrvLimagito1.log
service: limagito1
source: Limagito-source
6. Configure the historial log on Datadog to write to E:\LimagitoLogs
do "agent status" to get all the info about Datadog
_________
5. Configure Syslog on the Datadog VM
We have to install as well the syslog service on the Datadog VM, to do that follow these steps:
firewall-cmd --add-port=514/udp --permanent
firewall-cmd --add-port=514/tcp --permanent
firewall-cmd --add-port=10516/tcp --permanent
firewall-cmd --reload
firewall-cmd --list-all
Before installing the agent, go ahead and download visual studio code on the windows VM you are going to be running Limagito:
yum install syslog-ng
Edit the file /etc/datadog-agent/datadog.yaml an add:
inventories_configuration_enabled: true
Still on the yaml file, edit this line and set it to true:
logs_enabled: true
1) Create a "limagito.d" folder under /etc/datadog-agent/conf.d
- Custom Log data collection: https://docs.datadoghq.com/agent/logs/?tab=tailfiles#custom-log-collection
logs:
- type: tcp
path: /var/log/external/HS-FTPMOVERto/local0.log
port: 514
service: Limagito
source: Limagito-source
Start again:
- 1) I added this line to /etc/rsyslog.conf, but it was telling the module is already added
- 2) I did that cos I was following this article: https://docs.datadoghq.com/integrations/rsyslog/?tab=amazonlinuxcentosandredhat
- 3) I created this file /etc/rsyslog.d/datadog.conf
- This is a great article to follow: https://docs.datadoghq.com/integrations/rsyslog/?tab=amazonlinuxcentosandredhat
4)
Custom log collection
Datadog Agent v6 can collect logs and forward them to Datadog from files, the network (TCP or UDP), journald, and Windows channels:
Create a new <CUSTOM_LOG_SOURCE>.d/ folder in the conf.d/ directory at the root of your Agent’s configuration directory.
Create a new conf.yaml file in this new folder.
Add a custom log collection configuration group with the parameters below.
Restart your Agent to take into account this new configuration.
Run the Agent’s status subcommand and look for <CUSTOM_LOG_SOURCE> under the Checks section.
Troubleshooting
sudo cat /var/log/datadog/agent.log | grep ERROR
References
- https://www.redhat.com/sysadmin/log-aggregation-rsyslog
- https://docs.datadoghq.com/integrations/syslog_ng/
- https://docs.datadoghq.com/integrations/rsyslog/?tab=ubuntuanddebian
Comments powered by CComment