Lab Setup for Microsoft Exam 70-411
This article shows you how to create and configure a technical lab setup for Microsoft Exam 70-411 Administering Windows Server 2012, because....here we go again... Microsoft announced in late February 2020 that this exam will be retired at the end of June of this year of 2020, together with the whole MCSA certifications! https://www.microsoft.com/en-us/learning/community-blog-post.aspx?BlogId=8&Id=375282 I found that out thanks to NetworkChuck, good thing I subscribed to his You Tube channel! So... let's go and take this exam before the expiration date
Latest update! *guess that due to the virus crisis, Microsoft has extended the end of line time for these exams by the end of January 2021
Anyway, we need to pass this 70-411 exam before it expires, and it is a good opportunity as well to refresh and gain some Microsoft knowledge on the way, of course. So, let's go ahead and do this thing. The topics for the 70-411 Administering Windows Server 2012 are here:
- Deploy, Manage and Maintain Servers, WDS, WSUS and DCs
- Configure File and Print Services, DFS, FSRM, EFS and Bitlocker
- Configure Network Services and Access, DNS zones, VPN and Direct Access
- Configure a Network Policy Server Infrastructure, NPS and RADIUS
- Configure and Manage Active Directory, AD
- Configure and Manage Group Policy, GPOs
Here are the bits of what I've covered in this article
- Setup your lab
- Active Directory stuff
- GPO stuff
- DNS stuff
- WDS stuff
- WSUS stuff
- Remote Access stuff
- File Server Resource Manager (FSRM) stuff
- Bitlocker Drive Encryption stuff
- Distribution File System (DFS) stuff
- Performance Monitor stuff
- Auditing stuff
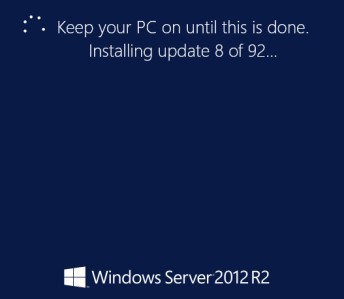
To create the different servers that we are going to use for this exam, get yourself a copy of VMware Workstation 15, and create a virtual machine with Windows Server 2012 R2 called "TEMPLATE_2012", then install on it the OS and make sure is up to date before proceeding... yup, the Windows Update might take a few hours to run...
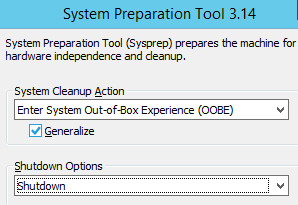
Once all Windows Update are done, run C:\Windows\System32\sysprep\sysprep.exe > choose OOBE and shutdown.... and of course don't forget to tick the checkbox "Generalise", otherwise all the VMS you create from that template will have the same SSID, not good!
You are ready now to create new Server 2012 R2 VMs based on that template. Using VMware Workstation, right-click the TEMPLATE VM and go to Manage > Clone > and create a linked clone
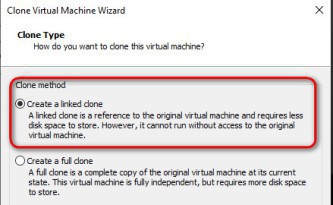
That way you can create as many 2012 R2 VMs as you need without wasting time installing OS, patches, etc. The is the list of the VMs that I created for this exam:
| Name | Role | IP Address |
| AD01 | Forest Root Domain Controller, CA, DHCP | 192.168.11.11 |
| AD02 | Domain Controller, ADFS | 192.168.11.12 |
| AD03 | RODC | 192.168.11.13 |
| WDS01 | WDS | 192.168.11.50 |
| WSUS01 | WSUS | 192.168.11.60 |
| SRV01 | DFS, BitLocker | 192.168.11.21 |
| SRV02 | DFS, FSRM | 192.168.11.22 |
| SRV03 | DFS, Direct Access, NPS | 192.168.11.23 (internal) DHCP (external) |
| SRV04 (not Domain joined) | Web Application Proxy | 192.168.11.24 |
| SRV05 | Remote Access VPN | 192.168.11.25 |
Download Remote Desktop Connection Manager on one of your servers to manage the lab environment from a single location https://www.microsoft.com/en-us/download/details.aspx?id=44989
To shutdown your lab at the end of the day, create a PS script with the line of command per server:
Shutdown /m \\AD02 /s /t 05 /c "end of play"
Remember that the good old "dcpromo" is depreciated in Windows Server 2012, but you still have to use it if you want to do an unattended installation or to promote a RODC with a pre-created exported settings (dcpromo /unattend). It might sound like a broken record, but it is good every now and then to have a review of the amazing features included in Active Directory:
- Active Directory Certificate Services; this is where you setup your PKI, Public Key Infrastructure certificates
- Active Directory Rights Management Services; creates reliable information protection solutions using technologies like encryption, certificates and authentication
- IP Address Management; customise and monitor the IP address infrastructure on a corporate network
- Kerberos Authentication; its version 5 is installed as a security support provider (SSP)
- Global Catalog; be mindful of the size of your Universal Groups, those are the ones that pass between GCs
- krbtgt account; the Key Distribution Center Service account is disabled and use by the operating system, it cannot be used to logon to the domain
Active Directory uses the concept of foreign security principals to allow permissions to be assigned to users who are not part of an Active Directory forest
Service Accounts Authentication; Local System account has more rights than Local Service and Network Service account. To create a service account for a specific service, do as follows in PS
New-Service -Name NAZAUDY -DisplayName "Nazaudy Service" -Description "Nazaudy test service"
-BinaryPathName C:\Windows\system32\notepad.exe
To run a service under its Virtual Account (virtually locally), set the username as NT SERVICE\$SERVICE_NAME$ with a blank password (don't forget the dollar sign at the end). Managed Service Accounts (MSA) are added by administrators as a Domain Account, but are tight to a specific machine only, which is a problem when you want to do accounts for farms or clusters; in situations where you want to use a MSA on more than one computer in a domain, create instead a Group Managed Service Account (gMSA). To create a 'manage' service account, do as follows:
New-ADServiceAccount -Name NAZAUDY3 -RestrictToSingleComputer
Add-ADComputerServiceAccount -Identity SERVER3 -ServiceAccount NAZAUDY3
Test-ADServiceAccount -Identity NAZAUDY3
#After the above, visit SERVER3 and run the following
Install-ADServiceAccount NAZAUDY3
#Finally, open services.msc in SERVER3 and link the NAZAUDY3 service to its account
Leave the password blank, it will be managed by AD
To create Group Services Accounts, the Key Distribution Service needs to be enabled, to enable it on your AD run this command:
Add-KdsRootKey -EffectiveImmediately
#Even though it says inmediately, there is actually a 10 hours delay for replication
#Create a group managed service account
New-ADServiceAccount -Name NAZAUDY4 -DNSHostName NAZAUDY4.nazaudy.local -PrincipalsAllowed ToRetrieveManagedPassword "Domain Computers"
#Install AD PS module on server4 and server5
Invoke-Command -ComputerName server4,server5 -ScriptBlock { Install-WindowsFeature RSAT-AD-PowerShell }
To use these accounts, the OS must be running Window 7 or higher for clients and Server 2008 R2 or higher for servers
FSMO Roles; Flexible Single-Master Operations, to check who has the roles installed on your domain, run:
netdom /query fsmo
#If using PS, use:
Get-ADForest
Get-ADForest nazaudy.local | FT SchemMaster, DomainNamingMaster
Get-ADDomain
#For the record, these are the FSMO numbers:
PDCEmulator 0
RIDMaster 1
InfrastructureMaster 2
SchemaMaster 3
DomainNameMaster 4
- Schema master and domain naming master; only one DC can have this role in the whole forest
- PDC, RIP pool manager and Infrastructure master are Domain specific, only one DC in the domain can have those roles. The PDC is a critical role, watch out for that one
To transfer roles you can use the GUI, but to 'seize' the roles you have to use the ntdsutil; the Domain-specific roles can be changed using AD Users & Computers, the Domain Name Master role (being Forest-specific) have to be changed using AD Domains & Trusts, and for the Schema Master you first need to register the tool that will allow you to change the role (ensure to run this with and account part of the Schema Admins group and with elevated privileges)
regsvr32 schmmgmt.dll
Once the Schema Management console is registered, add it through MMC >> Operations Master and change the role. To seize roles using ntdsutil, run:
ntdsutil
:connections
:connect to server ad02.nazaudy.local
:transfer schema master #for example
RODC is for locations that are not very secure, where maybe the AD can be stolen or compromise, perfect for an unmanaged branch office. Watch out for the "Allowed/Denied RODC Password Replication Groups" to control/filter which groups will have their password cached by the RODC. Domain admins and other superheroes must be members of the Denied group so that their password are never stored on a RODC.
To get the user or computer accounts that are authenticated by a RODC or that have passwords stored on the RODC, use this cmdlet:
Get-ADDomainControllerPasswordReplicationPolicyUsage -AppliedList OR -DeniedList
To get the security principals that are authorised to have their passwords cached on RODC, use this cmdlet:
Get-ADDomainControllerPasswordReplicationPolicy
To add local administrators so they can managed the hardware and software of a RODC, use the tool dsmgmt >> Local Roles
Cloning a DC; this is a new feature in Windows Server 20212 R2; to do the cloning of a DC proceed as follows:
- Add the DC source to the security group "Cloneable Domain Controllers", in other words add into that group the DC that you want to clone
- Run the PS "Get-ADDCCloningExcludeApplicationList -GenerateXml" to find out which applications/services might be incompatible with the cloning. If you happens to find an incompatible application, do the following:
- Create an empty file named DCCloneConfig.xml on the source DC
- Create a file named CustomDCCCloneAllowList.xml that contains the information in xml format of the app to be excluded from the cloning
- Run the PS "New-ADDCCloneConfigFile -ConeComputerName AD01 -IPv4Address 192.168.1.10 -IPv4SubnetMask 255.255.255.0 -IPDefaultGateway 192.168.1.1 -IPv4DNSResolver 192.168.1.100 -Static" to create a config file that is stored in C:\Windows\NTDS
- The above will check that the PDC is up in the domain, and that it runs Windows Server 2012
- Finally, once the clone is completed, remove both machines (the source and the newly created one) from the AD group
Maintenance of AD; if a domain controller goes bust, you will need to clear the metadata, using either dsa.msc or dsasite.msc; to do it using the ntdsutil run the following:
ntdsutil
:metadata cleanup
:connections
:connect to server ad01.nazaudy.local
:select operation target
:list domains
:select domain 0
:list sites
:select sites 0
:list servers
:select server 2
:remove selected server
Remember that ntdsutil /snapshots are not backup, you cannot restore from them; they are use for diagnostics purposes. To restore an AD, reboot on Active Directory Restore Mode -ADRM- (F8 or much better run msconfig >> Boot >> and set the boot mode in there)
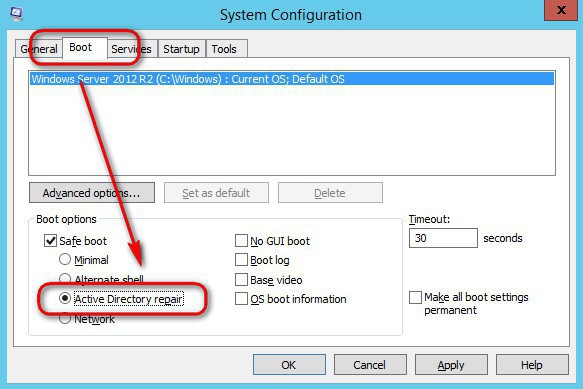
Non-authoritative restore is useful when corruption or hardware failure has occurred, while authoritative restore is when you want the replication of the restored object to occur overriding the live one. Once you have rebooted on AD Restore Mode, open cmd and run:
wbadmin get versions
#copy the version identifer listed on the clipboard
wbadmin start systemrecovery -version: xxxx
#After the restore, run ntdsutil to make authoritative, still in ADRM, of course
ntdsutil
:activate instance ntds
:auth res
:restore subtree "OU-myDeletedOUChild,OU-myOtherDeletedOUParent,dc=nazaudy,dc=local"
Finally, run msconfig and uncheck the option to ADRM
dsamain; this is the AD Database Mounting tool that allows you to view the contents of AD snapshots as well as to compare data from different snapshots
dsmgmt; utility used to managed local administrators, particularly useful in RODCs so you can add local admin without the need to have them on AD
repadmin; allows you to diagnose replication problems between ADs
ntdsutil; seize domain roles, clean metadata
ldp; restore a single deleted AD object by tombstone reanimation
wbadmin; the backup utility command line
adsiedit.msc; (GUI tool) manage objects and attributes in AD. You can use this tool to query, view and edit attributes that are not exposed through other AD MMC snap-ins. You can use this tool to start a DFS Replication service
AD Recycle Bin; the recommended way of restoring objects from AD is to use the AD Recycled bin, so we don't have to take AD offline, etc. To enable the Recycle Bin launch Server Manager >> AD Administrative Center >>> highlight your domain and choose "Enable Recycle bin". In order to use it, your forest functional level must be 2008 R2, and once the recycle bin is on... you can't turn it off, but come on that's okay. To enable it using PS run the following:
Enable-ADOptionalFeature -Identity "Recycle Bin Feature" -Scope ForestOrConfigurationSEt -target nazaudy.local
Password Settings Object; the Default Domain GPO password policy applies to the whole domain, but if you want to be specific and have password policies for different users or groups, you can launch AD Administrative Center and configure PSO. Note that in order to use PSO the Functional Level of the domain must be Window Server 2008

The "Precedence" setting allows you to order the priority when more than one PSO applies, the lower the value the higher the priority (1 is the best); and whichever PSO you use will override the Domain one (unless of course you remove it, in which case the Domain setting will take over). Note that PSO can only be applied to a User or a Global Security Group, they cannot be applied to computers or OUs
To get the settings for the Password Policy of the domain, run:
Get-ADDefaultDomainPasswordPolicy
Remember that Kerberos Policies can only be applied at the domain level, any changes requirements to them implies the creation of a child domain
The default processing order for GPOs is: Local >> Site Policies > Domain Policies > OU Level > other OUs. The last writer always wins, so watch out for the "Link Order" when you apply more than one policies to objects, they'll be applied from top to bottom with the "Link Order" value 1 being the last one to be applied and therefore the winner
Remember the good old motto "AGDLP", meaning Accounts goes into Global, Global groups goes into Domain, Domain groups goes into Local, and the Local Groups is where you should apply the permissions: AGDLP, AGDLP, AGDLP, remember it!
When you set "Block Inheritance" in an OU, no upper policies attached to the parents OUs will be applied to that OU, as it blocks inheritance... unless the upper policies has the "Enforced" setting on, in which case.. there is no way you candeny your genes
#In GPO Management console, right-click OU > Group Policy Update
#From command prompt: gpupdate
gpupdate /force /target:computer #refreshes the GPOs for the computer
#From PS: Invoke-GPUpdate -Computer CLIENT1
To see whether the policies has been applied or not, use Resultant Set of Policy (rsop) or run:
gpresult /r /scope:computer #display result for the computer only
gpresult /r /scope:user
rsop.msc #sees the results in a GUI
Use the entry "Group Policy Results Wizard" at the bottom of the GPO Mgmt console
GPO Loopback processing; intended for public places, laboratories and classrooms, it applies the user policy (or merges it) no matter which computer the user logs into. You find this setting under Computer Configuration >> Policies >> Administrative Templates >> System >> Group Policy >> Configure user Group Policy loopback processing mode ; when loopback is enabled in Merge mode, user settings from the computer's GPO take precedence in GPO conflicts. Study the different settings under Administrative Templates >> System >> Group Policy, some of them are really interesting like for example:
- To speed everything up on slow links, enable "Change Group Policy process to run asynchronously when a slow network connection is detected"
- To apply GPOs more frequently, modify "Set Group Policy refresh interval for computers"
- GPO caching is enable by default on the clients (the policies there just allows you to customise the settings) but disabled by default on the server side; caching speed up synchronous foreground processing, so for a period of 90' it will not download the GPOs from the domain but read them from the cache instead, unless they change of course
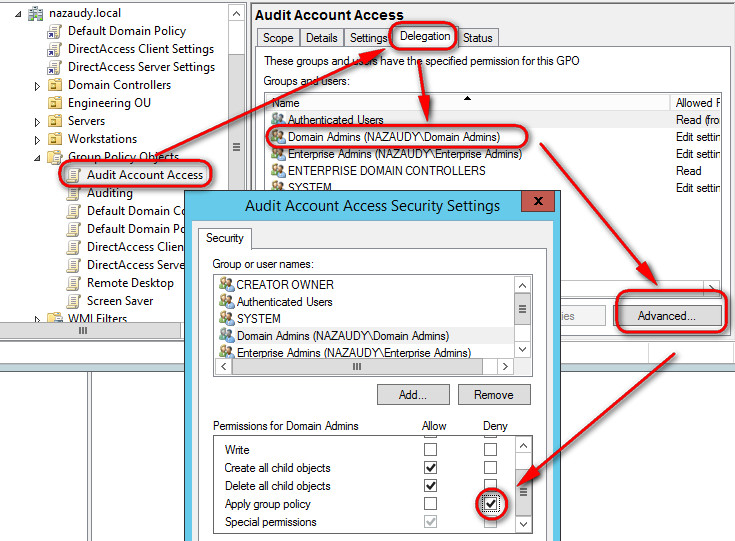
Use Security Filtering to apply the policy to specific users/groups, and to prevent a certain user or group from getting the policy applied, you can visit Delegation >> Advanced and deny them the access
WMI Filters; allows you to target GPOs based on the VMI (Windows Management Instrumentation) classes of OS properties or specific hardware
Get-WimObject win32_operatingsystem | fl *
Get-WimObject win32_computersystem | fl * #show WMI classes info at hardware level
To create a WMI query use the syntax: SELECT *** WHERE *** LIKE ***AND; for example, to target laptops use: "SELECT * FROM Win32_Battery WHERE (BatteryStatus <> 0)" meaning that when the battery status doesn't equal zero (otherwise 1 or above), we are selecting the machines, in other words only laptops
Select * from Win32_LogicalDisk where FreeSpace > 10737418240 AND Caption = "C:"
#this WMI filters select the C:\ drive only if there is more than 10GB of free space
Select * From Win32_TerminalServiceSetting Where TermianlServerMOde = 1
#this VMI filters machines that have the Remote Desktop Servers role installed
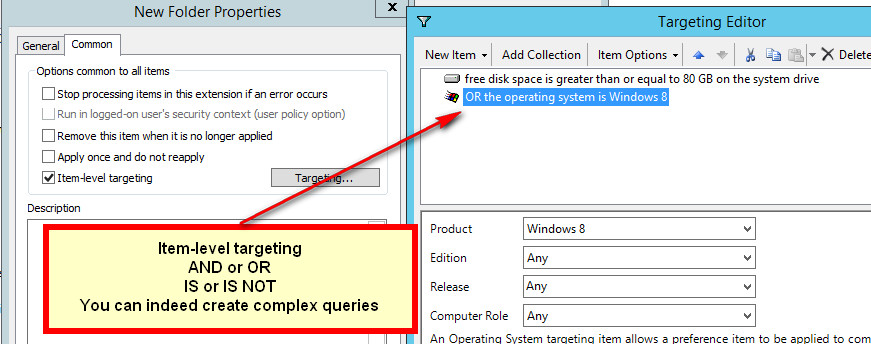
VMI Filters are different from Item-level targeting (ILT) in that VMI Filter only filters one thing or more than one thing as a group, while Item-level targeting can filter with the AND or OR operators, allowing you to construct specific queries
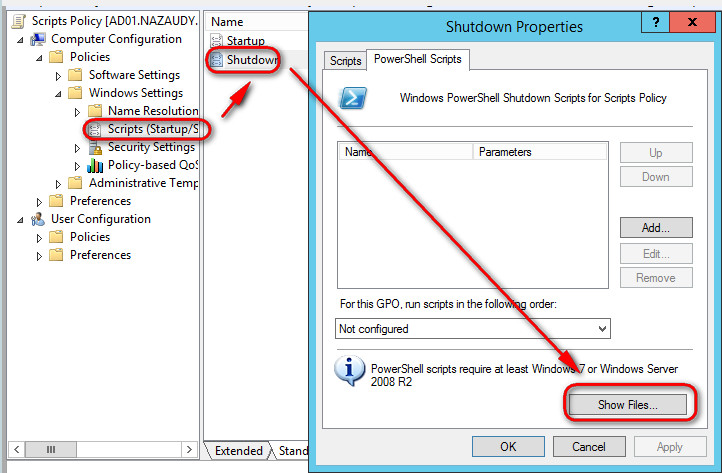
Start-up/Shutdown scripts; you can also use PS scripts, but in all scenarios ensure the Computer and/or Users have got access to the resources, and of course that you places the .ps1 files in the right location of the GPO, you can find that by clicking on "Show Files"
When you install software through GPO, import any .admx (plus the associated adml) files that might be available from the manufacturer. Copy the "PolicyDefinitions" folder from C:\Windows\ to C:\Windows\SYSVOL\domain\Policies, and them paste in there the admx files from the given application; remember that the "PolicyDefinitions" folder must be manually created in the Policies folder of the SYSVOL, otherwise it won't work. The adml (language) files go into the en-us folder, as explained in here:
To filter a GPO and find the setting your are so desperate looking for, right-click Administrative Templates >> Filter Options and tick "Enable Keyword Filters" to customise your search, such a handy feature!

Backup GPOs to a folder; to backup GPOs open gpmc.msc >> Right-Click the "Group Policy Objects" and select Backup All. Note that the GUIs on the backup repository are backup-related-GUIs, not the actual GUIs of the GPOs. To do this process on PS run:
Backup-GPO -All -Path \\backupserver.nazaudy.local\Storage\Backups
To restore a specific policy, right-click "Group Policy Objects" >> Manage backups >> pickup the policy you want to restore and start the wizard. Note that this backup process doesn't include the WMI filters, inheritances or delegations, just the GPO settings, so remember that when restoring
Migrate GPOs to another domain; to do that, right-click 'Group Policy Objects" >> Open Migration Table Editor >> Tools >> Populate from GPO and select the policy that you want to migrate, then select the destination of the DC that you want
Delegation gives other the power to change and modified the delegated OU (remember that you can only delegate control to an OU); just refer to the "Delegation" tab and add the relevant group/user you want to modify that policy
Best practices: Use the Default Domain Policy only for the Account policies (account lockout, kerberos, etc) and use the Default Domain Controllers Policy for user rights and auditing; outside of that, please create your own GPO. In any case, if these Default policies are corrupted, etc, run this command to set them to their original settings:
dcgpofix /target:dc
dcgpofix /target:domain
dcgpofix /target:both #that will reset both, probably the best one!
After a domain rename operation, you should use gpfixup to fix dependencies of GPOs
Group Policies Preferences; gpp are client side extensions that pre-configure preferences for computers and users, that can be override and provide a starting point for the configuration, perfect for mapping drives ('update' is the most flexible choice, which creates it if it doesn't exist). Item-level targeting allows you to specify and filter with great details how the setting will apply, so you can configure a GPO called "Drive Mapping" at the domain level and item-target each mapping in accordance with group membership
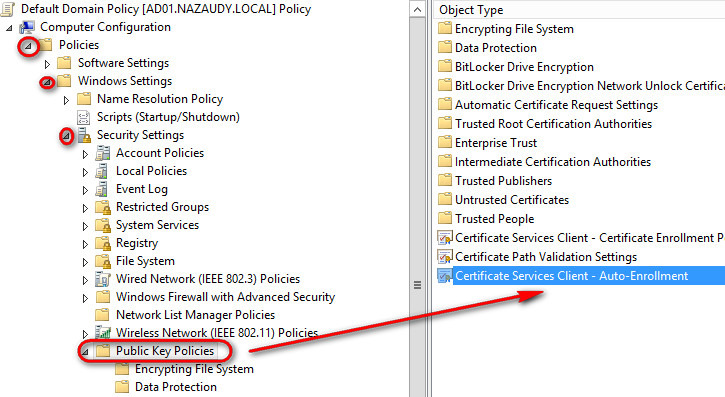
PKI Infrastructure; certificates add a layer of protection, and you can use GPOs to manage all of that. Enable Certificate Auto--Enrolment by visiting Computer Configuration >> Policies >> Windows Settings >> Security Settings >> Public Key Policies and edit the option in "Certificate Services Client - Auto-Enrolment"
DNS is defined in RFC 1034 and 1035, the distributed database is thought as an "inverted tree", that's why the root (.) is at the top and from there the branches develop downwards through the TLDs, Top Level Domains like .com, .net, .org, etc. Only 13 root name servers are responsible for delegating TLDs. These are the types of DNS Queries you could have:
- Iterative queries; the DNS server receives a query, and it responses with the best information it possesses at the time
- Recursive queries; the DNS server receives a request and it takes full responsibility for resolving the name; if it has the information it replies immediately but if it doesn't it will send referral to other DNS servers until it finds the info needed
- Inverse queries; instead of supplying a name and then asking for an IP address, in this query the client first provides the IP address and then asks for the name. It uses the in-addr.arpa domain to resolve this query, where IP addresses are listed left to right given the fact that they are most specific from left to right
Set a low TTL only when you need to respond quickly to a changing environment; a high TTL (let's say once a week) means that if you make a change in a DNS record the clients might not see the change for up to a week. Therefore, use always a TTL that is appropriate for your environment
A secondary zone gets its database from a primary zone, they are use for load balancing providing fault-tolerance. Stub Zones are similar to Secondary Zones (they are non-editable copies of a primary zone) but differ in that they only contain information, usually 3 record types (NS, SOA and A records), to identify the authoritative DNS servers for the zone. Stub Zones are used when companies merges or to connect 2 x domains across a slow link, they are NOT for redundancy or low balancing, their only advantage is that you basically contact the server directly for DNS queries, rather than going all the way up to the root servers and then down
In the Zone Transfers tab of DNS you have the "Notify..." button, add the IPs of whichever secondary DNS sever you want to push data to whenever there is a change in your DNS
While on the DNS Management Console, go to View and select "Advanced", then you can set a record stamp for every A record that you want to delete after it becomes stale
Background Zone Loading; when an AD-integrated DNS server restarts, the AD zone data populates the database in the background, allowing DNS to server clients almost immediately after the restart while the zone is still being loaded
- RODC ;read-only domain controllers are use for sites where security is a concern
- DNS Socket Pools; allow port randomisation to protect against DNS cache-poisoning attacks
- DNS Cache Locking; allows cached DNS records to remain safe for the duration of the TTL value, meaning cached DNS records cannot be overwritten or changed, making it more secure against hackers. The locking configuration is based on a percentage value, for example if you set the cached locking to 50% then the records will be securely locked half of the TTL
- DNS Security Extensions; DNSSEC protocol allows your DNS servers to be secured by validating DNS responses; a zone implemented with DNSSEC get all of its DNS resource records marked with a digital signature
- Trust Anchors; they are preconfigured public keys linked to a DNS zone that allow DNS servers to validate the DNSKEY resource records. If the server is not AD integrated, the trust anchors are stored in trustanchors.dns; to view them run the PS: Gete-DnsServerTrustAnchor yourdomain.local
- DNS Devolution removes the leftmost label of the namespace, allowing a client of a child domain to query the parent domain natively
- Netmask Ordering ;as you know with Round Robin the client A goes to queue A then client B to queue B, then C to queue A, thus providing load balancing. With netmask ordering (which is part of the round robin process), the server detects the netmask of the querying client
- DNSUpdateProxy group; create a user account to run the DHCP sever, then add that account to the DNSUpdateProxy group in AD, this will ensure that DHCP securely updates DNS
Note that the trailing dot (.) at the end of a CNAME means the root domain, e.g., ad01.nazaudy.local.
DNS Caching-Only Server; they are not authoritative for the domain, and the information that they contain is limited to what has been cached while resolving queries; they are configure simply by populating the root server under the Root Hints tab in DNS
DNS delegation; is when you divided your zone, for example from nazaudy.local you decided to have london.nazaudy.local, chicago.nazaudy.local, malaga,nazaudy.local and delegate to a authoritative DNS on each on these locations the zone
DNS Forwarding; it can either be external, where the query is sent to the Root Hints, or conditional forwarding, where the query is sent to another DNS server (for example your internet provider DNS) for resolving
Troubleshooting; use the good old guy nslookup to troubleshoot; DNSLint is an utility that you need to download from Microsoft https://support.microsoft.com/en-gb/help/321045/description-of-the-dnslint-utility it verifies DNS records and generates a report in HTML, e.g. dnslint /d nazaudy.local. DNScmd is a powerful tool that allows you to display and change the properties of DNS servers, zones and resource records, as well as forcing replication between two servers
If you need to replicate to BIND Unix servers, tick the option "Enable BIND Secondaries" under the Advanced tab of the DNS server
For scavenging to operate, it must be enable both at the server and zone level
To install Windows Deployment Service (WDS) using PS, execute the following (not required but is recommended to reboot after installation):
Get-WindowsFeature WDS* #shows you what is already installed
Install-WindowsFeature WDS -IncludeAllSubFeature -IncludeManagementTools
Get-Command -Module WDS #shows you all the commands you can use with WDS
- After installation, insert a Windows 7 iso disk on the WDS server, then choose WDS > Boot Images > and add the /source/boot.wim from the Windows 7 DVD
- Copy the "install.esd" file from sources and paste locally on your machine into a folder called "WIN10_ISO", then convert it from the compressed ESD format to the WIM format by running: dism /Export-Image /SourceImageFile:D:\Win10_ISO\install.esd /SourceIndex:9 /DestinationImageFile:D:\Win10_ISO\install.wim /Compress:Max /CheckIntegrity
- Under "Install Images" add a group called Windows 10 (group are used as a security boundary), then Add Install Image and add the *.wim file that you have just converted. In the previous extraction we selected SourceIndex:9, but if you want to see actually how many images are included on the ESD file, run dism /Get-WimInfo /WimFile:D:\Win10_ISO\x64\Sources\install.esd
- If you right-click a Boot Image you can create from it 2 x types of images:
- Capture Image ;boot from this image to capture the status of the client and create an image from it with the needed apps, settings, etc
- Discovery Image ;use on secure environment, you'll boot from this image and will only communicate to the specified WDS, DHCP, etc
- On your DHCP server, configure option 66 (wds server name) and option 67 (boot image name) for your scope
To configure Windows Update Services (WSUS) you must have local admin rights. WSUS (as well as Windows Updates) ensures that every updates is digitally signed by Microsoft, if it is not it will be discarded, thus preventing hacking from happening. Gosh, just image if a trojan is distributed through Windows Update, billions of PCs infected in just a few hours!
To configure Automatic Updates through the registry, instead of GPO, visit: HLM >> Software >> Policies >> Microsoft >> Windows >> WindowsUpdate > AU ;then specify the following:
- UseWUServer ; 1 means you'll provide yours, 0 uses the public Microsoft Update Server
- WUServer ;enter the URL of your WSUS, for example http://myWUS (note is http, not https)
To install WSUS using PS, do as follows:
Get-WindowsFeature UpdateServices* #shows you what is already installed
Install-WindowsFeature UpdateServices,UpdateServices-DB -IncludeManagementTools
Get-Command -Module UpdateServices #shows you all the commands you can use with WDS
Out of the box, the Reports sections of WSUS does not work. You'll need to download Microsoft Report Viewer 2008 SP1 https://www.microsoft.com/en-us/download/details.aspx?id=3841 , which in turn requires that you Manage >> Add Roles and Features and add .NET Framework 3.5, which will required you to insert the Windows 2012 R2 DVD and point to it as the source D:\sources\sxs... Honestly, I really don't know why M$ hasn't included the 3.5 Framework on the local copy of the OS, like many of the other features
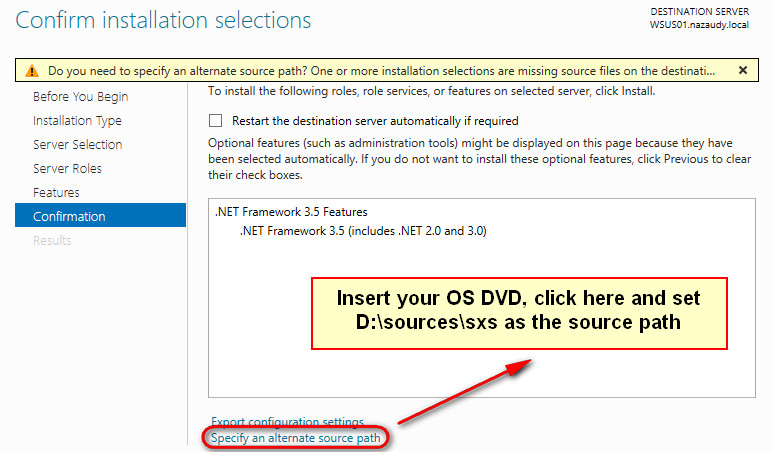
On the WSUS console visit Options >> Computers, and to start registering clients set:
- Use the Update Services console; known as server-side targeting where you create groups manually and drag computer accordingly
- Use Group Policy or registry settings on computers; that's the way to do it really
Edit the Domain GPO >> Computer >> Policies >> Administrative Templates >> Windows Update >> and set:
- Specify intranet Microsoft update service location: Enabled, set both detection and statistics to http://mywsus.nazaudy.local:8530
- Configure Automatic Updates: Enabled, 4-Auto download and schedule the install, every day at 6pm; I recommend you to have "disabled" the Install during automatic maintenance
- Automatic Update Detection frequency: Enabled, set it to 3 hours so that machine will check the WSUS for update on that interval
Here is an example of a working configuration of WSUS currently in production:
Now edit the GPO of the OUs where you have your Computer and set the "Enable client-side targeting" to whichever group you want the machines to be on WSUS, else they'll go into Unassigned Computers. Run gpupdate /force target:computer on the affected machines. The command Windows-Update Auto-Update Client, wuauclt /detectnow and then wuauclt /reportnow on the clients, and they will check WSUS and register if needed
As part of VPNs we have the following protocols:
- PPTP Tunnelling; pretty straightforward, it encapsulates packets using the "Encapsulation Primer" method, but then encrypt it using MPPE (Microsoft Point-to-point encryption). The encryption keys are generated dynamically for each connection
- LT2P/IPsec Tunnelling; more flexible than PPTP but also more complicated. L2TP uses port 1701, it doesn't offer any security, but its traffic is then encrypted by IPSec using ISAKMP which does provide security
- SSTP Tunnelling; Secure Socket Tunnelling Protocol uses port 443, https
Web Application Proxy (WAP) ; allows the users to access internal applications from outside the network using BYOD.There are basically 2 ways of authentication, and on both cases ADFS (AD Federation Services) is a requirement
- ADFS Authentication; provides SSO (Single Sign-On), multi-factor authentication and Workplace Join
- Pass-through Authentication; the user is authenticated to the application it is going to access, not through AD
To configure a certificate for ADFS, follow this amazing guide:
If you cannot complete the AD FS Web Application Configuration Wizard, go through these documents:
- https://shanejacksonitpro.com/2017/08/04/adfs-wap-proxy-an-error-occurred-when-attempting-to-establish-a-trust-relationship-with-the-federation-service/
- https://www.experts-exchange.com/questions/28705557/Web-application-proxy-not-connecting-to-ADFS-box.html
Normally the Web Application Proxy server is placed in the DMZ (therefore not AD-joined), also notice that the path for both the external link application and the internal one must obviously be the same
Direct Access; is a always-on VPN. In comparison, and from the point of view of the user, Direct Access is much better than VPN, though from the admins point is a lot more difficult to configure. It requires IPSec, IPv6 and a Public Key Infrastructure; Windows Firewall must be enable on all devices and in the communication between the client (IPv4) and the server (IPv6) an IPv6-over-IPv4 tunnel is created using either 6to4 or Teredo
Direct Access Server; needs to be "multihomed", with 2 x nics one internal and the other for the Internet; it also needs to be domain-joined for the GPOs to be applied, that's a requirement
Being an IPv6 technology, Direct Access uses IP-HTTPS. The Network Location Server allows the client to determine whether they are inside or outside the network, and by the way the clients needs to be "Enterprise" edition of Windows 10
Extensible Authentication Protocol; EAP doesn't provide any authentication itself, instead it relies on external third-party authentication method including smart cards, secure access tokens, ordinary passwords, etc; each authentication schema is called "EAP Type", and each EAP type is implemented as a plug-in module; EAP-TLS is the strongest authentication that you can use
Conditions determine if a policy if applied to a connection, while Constrains happens after a policy has already been applied to that connection. The certificate for the NPS server is never placed on the client machines, it is only installed in the Personal store under Certificates (Local) on the NPS server itself; what the clients need to have is the certificate of the trusted root that issued the NPS certificate in the Trusted Root Certificate Authority
Network Access Protection (NAP); has been depreciated in Windows Server 2016, and what it does is to check the computer for antivirus, windows updates and firewall status before admitting the remote computer to the network. The unhealthy clients go into a remediation area, and auto-remediation fixes some problems, like for example starting Windows Update service if stooped. Before connecting, the NAP-enabled clients need to have the service "Network Access Protection Agent" started, then run "napclcfg.msc" and enable the type connection you'd be using; lastly enable the enforce network access protection on the VPN setting connection. To ensure clients can discover the HRA server (Health Registration Authority) you need to add an SVR record for it on DNS, create a GPO that modifies the Request Policy setting for the NAP client and set the EnableDiscovery = 1 for the clients under HKLM >> SOFTWARE >> Policies >> Microsoft >>NetworkAccessProtection >>ClientConfig >> Enroll >> HcsGroups
mbsacli.exe /hf -h AD01 #scans machine AD01 for vulnerabilities
mbsacli.exe /hf -i 192.168.0.x #scans machine with that IP address
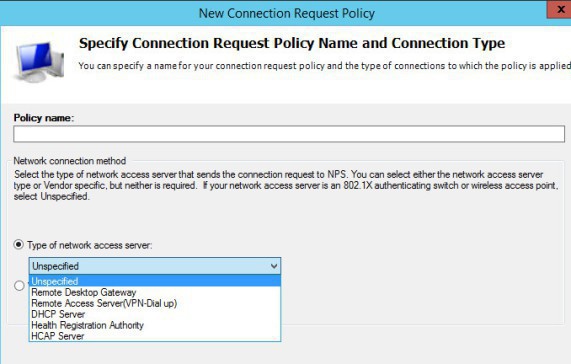
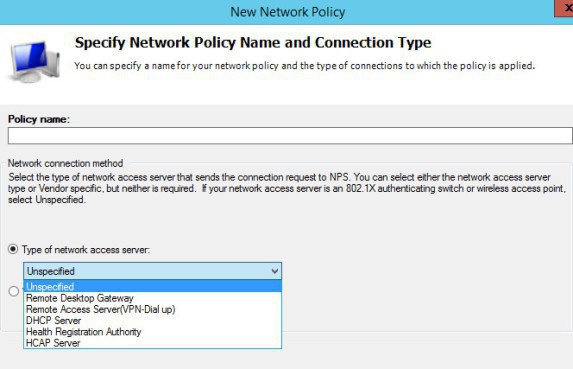
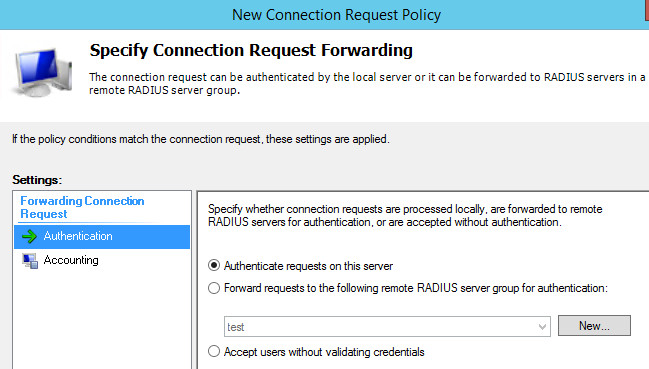
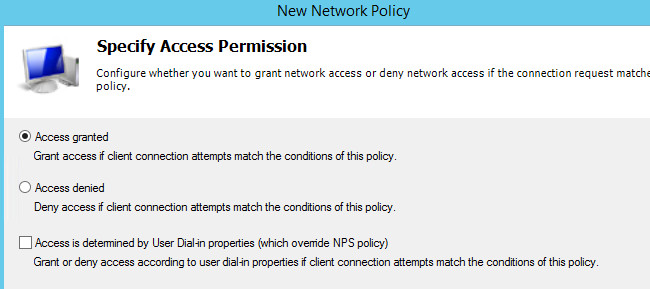
Connection Request Policies vs Network Policies
Connection Request Policies are sets of conditions and profile settings that allow connections, and give network administrators flexibility in configuring how incoming authentication and accounting requests (RADIUS clients) are handles by the NPS. With connection request policies you can use NPS as a RADIUS server or as a RADIUS proxy
Network Policies, on the other hand, are a sets of conditions, constrains and settings that allow you to designate who is authorized to connect to the network and the circumstances under which they can or cannot connect. Network policies can be viewed as rules, where each rule has a set of conditions and settings
File Server Resource Manager (FSRM) stuff
To install FSRM using PS, execute:
Install-WindowsFeature -Name -FS-Resource-Manager -IncludeManagementTools
BitLocker Drive Encryption stuff
It uses the chip Trusted Platform Module (TPM) version 1.2 or newer to store the security key; if you don't have a TPM chip on your mobo (it must be an old mobo then!) you can store the security key on a USB, which will be needed every time the system reboot. The Bitlocker version in Windows 7 had to encrypt the whole drive, while now the new version for Window 10 can encrypt only the space used, thus making the encryption process a lot faster. Network Unlock allows an administrator to unlock an encrypt a hard drive during boot process while the device is connected to a trusted environment. Although it does not need to be configured, the WDS role must be installed for Network Unlock to be installed too. Full Disk Encryption (FDE) encrypts block by block, offering a much better encryption but slows the HDD down a bit
The BitLocker installation requires two reboots of the sever, to install it using PS run:
Install-WindowsFeature BitLocker -IncludeAllSubFeature -IncludeManagementTools -Restart
When using EFS (Encrypted File System) you can use the cipher.exe command line to manage the files. If your machine does not have a TPM chip, use these GPOs to configure Bitlocker:
- Default Domain > Computer Config > Admin Templates > Windows Components > Bitlocker Drive Encryption > Operating System Drives > Require additional authentication at startup : Enable
- Default Domain > Computer Config > Admin Templates > Windows Components > Bitlocker Drive Encryption > Operating System Drives > Choose how Bitlocker-protected OS drives can be recovered : Enable
Network Unlock has lots of requirements like PKI infrastructure, DHCP and WDS
When using BitLocker on the Cluster Share Volume (CSV) of a failover cluster, run the cmdlet "Add-BitLockerKeyProtector" on each of the nodes
To lock a drive, for example D:\, use the following:
manage-bde on d: -recoverypassword
To change the password for a TPM chip run "Set-TpmOwnerAuth"
Distributed File System (DFS) stuff
The 3 main tasks you have to do after the server roles and roles services are installed are:
- Create a Namespace
- Share and publish the folders
- Create a Topology for the replication
To use DFS install the roles "DFS Namespaces" (it gives you the virtual tree) and "DFS Replication". Some of the advantages of using DFS are:
- Simplified Data Migration; because users don't need to know the physical location of the data, this one can be move from server to server by admins
- Security Integration; all access is rule by NTFS
- Access-Based Enumeration (ABE); DFS can display only the filles users have access to, and hide the rest
Some PS command that you can do with DFS are these:
Get-WindowsFeature FS-DFS*
Install-WindowsFeature FS-DFS-Namespace -IncludeManagementTools
Get-Command -Module DFS*
Invoke-Command -ComputerName SRV01,SRV02 -Command {Install-WindowsFeature FS-DFS-Replication}
Invoke-Command -ComputerName SRV01,SRV02 -Command {Install-WindowsFeature FS-DFS-Namespace}
When configuring replication you might want to turn off the synchronisation protocol "Use remote differential compression (RDC)" if the servers affected are on the same network segment. You must have this setting on if the connection between the servers is slow
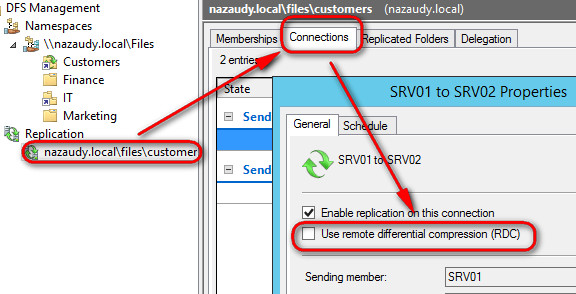
Watch out for the quota of the "Staging" folder, it needs to be big enough to replicate the files on your DFS Name infrastructure, visit Event Viewer >> Application & Services >> DFS Replication for any errors in the logs. It is recommended to put the "Staging" folder and the actual replicated folder on different drives. For initial replication, remember that Robocopy is far more efficient than the replication protocol
A new feature of Server 2012 R2 is the ability to clone a DFS database to another server instead of waiting for DFS replication to complete; to do so follow these steps:
- Create a replication group and a replication folder [New-DfsReplication -GroupName "REP01"] [New-DfsReplicateFolder -GroupName "REP01" -FolderName "FOLDER1"]
- Add the upstream server as a member of the DFS topology, a member of the group and folder
- Run Update-DfsConfigurationFromAD to update the DFSR AD Domain configuration on the upstream server
- Wait for replication to complete, you'll know is completed when Event ID 4112 shows up in the DFS Replication Event log
- On the upstream server, export the cloned database by using Export-DfsClone cmdlet. The export will be completed when you see event ID 2402
- Use Robocopy to preseed the files
- After that, use robocopy.exe to copy the files to the destination server
- And finally, import the cloned database into the destination server
A new feature of Windows Server 2012 R2 is the ability to restore files from the "ConflictAndDeleted" and "PreExisting" folders by using the cmd Ge-DfsPreservedFiles
The prefetch folder is a folder that Windows uses to store programs to shorten the amount of time it takes to startup programs by minimizing disk head movements
Open Server Manager >> Tools >> and there you'll see both Performance Monitor and Resource Monitor
Registry changes happens without the need to reboot. Make only one change at a time, otherwise (if you make too many changes) you'll never know which of those changes had the positive impact; in addition, making one change at a time allows you to roll back if needed. The System Stability Index of Performance Monitor (perfmon.msc) goes from the value of 1 (least stable) to up to 10 (most stable). These are some of the tools included with Performance Monitor:
- Data Collector Sets ;defines where the logs are stored , the credentials to run the set and when the logs are run
- Other tools you can use are Network Monitor (you can download it here: https://www.microsoft.com/en-gb/download/details.aspx?id=4865), Task Manager and Event Viewer. The different tabs of Task Manager are Process (see memory and CPU allocation), Performance (see graphs), Users (disconnect and message them), details (stop applications and set affinity level) and Services (stop and start, also can open services.msc from there)
- The Subscriptions section of Event Viewer allows you to receive alerts about events that you predefine. Custom Views is a great way of creating a view of the logs that you're interested in
- SNMP ;install the SNMP from Roles and Features, then configure the Service using "services.msc"
- The good old Microsoft Baseline Security Analyser (MBSA) can still be downloaded from here: https://www.microsoft.com/en-us/download/details.aspx?id=19892 Run a scan when you open the app to check for vulnerabilities
mbsacli.exe /hf -h AD01 #scans machine AD01 for vulnerabilities
mbsacli.exe /hf -i 192.168.0.x #scans machine with that IP address
To collect all the logs from your servers to go into a particular server, do as follows:
1) Create a "Source Computer Initiated" subscription from the receiving server, selecting a group of the Server that you want to receive logs for and the type of logs you want to see
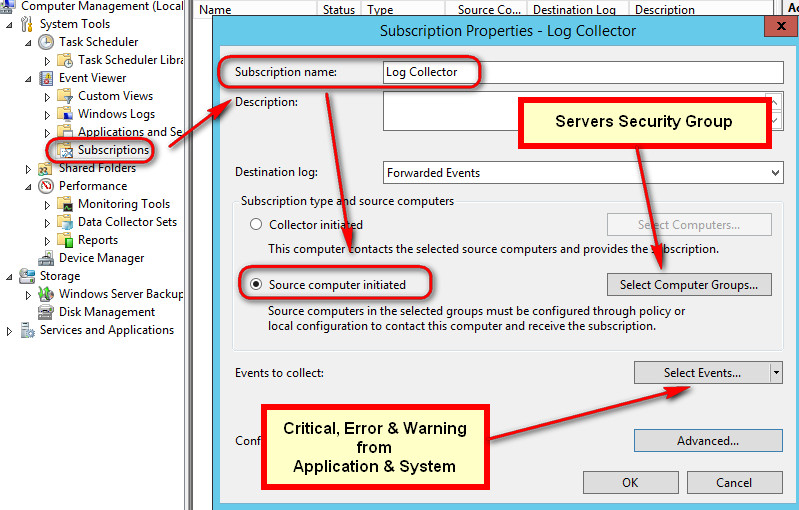
2) Create a new GPO and edit the setting Windows Computer >> Event Forwarding >> Configure the server address to read the FQDN of the collector (ad01.nazaudy.local) in the format of:
- Server=HTTPS://<FQDN of the Event Collector server>:5986/wsman/SubscriptionManager/WEC,Refresh= <Refresh interval in seconds>,IssuerCA=<Thumbprint of the issuing CA certificate>
For example, on my case it will be:
- https://ad01.nazaudy.local:5986/wsman/SubscriptionManager/WEC,Refresh=300,IssueCA=
3) Configure GPO > Configure Target Subscription Manager setting on the Servers OU, so that they point to the log server you have just added
then link the GPO to your server's OU and wait for the magic to happens
Use the settings of GPO Policies >> Windows Settings >> Security Settings >> Audit Policy ;the "auditpol.exe" command can be used to backup, restore and set audit policies. Refer to this my other article for a deep dive on Account Audit Policies:
Expression-Based Audit Policies are use with Dynamic Access Control to allow admins to track al read/write operations on files that are considered critical. When using Advanced Audit Policy Configurations, ensure that those settings are not overridden by basic audit policy configurations
London, 9 April 2020
Troubleshooting
If during this lab you encounter this error message at the time of accessing by server by Remote Access: "An authentication error has occurred. The function requested is not supported. This could be due to CredSSP encryption oracle remediation"
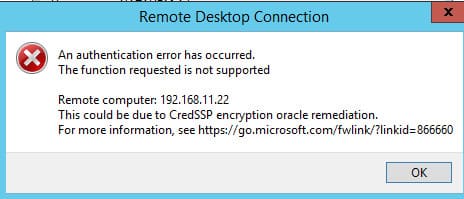
To fix this error run Windows Update and install the latest patches
References
- https://www.winhelponline.com/blog/convert-esd-to-wim-dism-windows-10/
- https://evilgpo.blogspot.com/2014/11/showdown-wmi-filter-vs-item-level.html
- https://dirteam.com/sander/2012/09/04/new-features-in-active-directory-domain-services-in-windows-server-2012-part-8-group-msas-gmsas/
- https://www.itprotoday.com/windows-8/q-how-do-i-modify-user-and-group-read-only-domain-controller-rodc-management-permissions
- https://jackstromberg.com/2013/11/enabling-ssl-on-windows-server-update-services-wsus/
- https://docs.microsoft.com/en-us/previous-versions/orphan-topics/ws.11/jj574182(v=ws.11)#BKMK_12
- https://docs.microsoft.com/en-us/previous-versions/windows/it-pro/windows-server-2012-R2-and-2012/dn466518(v=ws.11)?redirectedfrom=MSDN
- https://docs.microsoft.com/en-us/previous-versions/windows/it-pro/windows-server-2008-R2-and-2008/cc766404(v=ws.11)?redirectedfrom=MSDN
- https://docs.microsoft.com/en-gb/archive/blogs/grouppolicy/red-green-gp-preferences-doesnt-work-even-though-the-policy-applied-and-after-gpupdate-force
- https://faultbucket.ca/2012/08/fixing-a-dfsr-connection-problem/
- https://www.vkernel.ro/blog/configure-wsus-to-use-ssl
- https://docs.microsoft.com/en-us/previous-versions/windows/it-pro/windows-server-2012-R2-and-2012/jj134239(v=ws.11)?redirectedfrom=MSDN
- https://www.thomasmaurer.ch/2012/08/windows-server-2012-hyper-v-how-to-clone-a-virtual-domain-controller/



Comments powered by CComment