How to install Apache Tomcat on CentOS 7
In this article I describe in a nutshell how to install Apache Tomcat on CentOS 7 Linux box, the version of Apache is 8.5.24. The steps that I cover are the following:
- Install Java
- Download Apache Tomcat using wget
- Set permissions
- Set system unit file
- Install haveged
- Setup firewall exclusions
- Configure the xml files
Run the following commands to update your system and install Java if needed
yum -y update
yum -y install epel-release
yum install java-1.8.0-openjdk.x86_64
2.- Download Apache Tomcat using wget
Create the location from where Apache Tomcat will run (/opt/tomcat/, also called Catalina's home) and also create a dedicate non-root user for the service
mkdir /opt/tomcat
groupadd tomcat
useradd -s /bin/nologin -g tomcat -d /opt/tomcat tomcat
While on the /opt/ folder , download Apache Tomcat (we are going to be using version 8.5.25) from this link:
wget http://www.mirrorservice.org/sites/ftp.apache.org/tomcat/tomcat-8/v8.5.28/bin/apache-tomcat-8.5.28.tar.gz
tar -zxvf apache-tomcat-8.5.28.tar.gz -C /opt/tomcat --strip-components 1
//**by using the "--stript-components 1" you're untaring the .gz file at the root of opt/tomcat
Set the proper permissions before running the service
chgrp -R tomcat conf
chmod g+rwx conf
chmod g+r conf/*
chown -R tomcat logs/ temp/ webapps/ work/
chgrp -R tomcat bin
chgrp -R tomcat lib
chmod g+rwx bin
chmod g+r bin/*
You need to setup as well a system unit file for Apache Tomcat service
vi /etc/systemd/system/tomcat.service
//**populate the above file with:
[Unit]
Description=Apache Tomcat Web Application Container
After=syslog.target network.target
[Service]
Type=forking
Environment=JAVA_HOME=/usr/lib/jvm/jre
Environment=CATALINA_PID=/opt/tomcat/temp/tomcat.pid
Environment=CATALINA_HOME=/opt/tomcat
Environment=CATALINA_BASE=/opt/tomcat
Environment='CATALINA_OPTS=-Xms512M -Xmx1024M -server -XX:+UseParallelGC'
Environment='JAVA_OPTS=-Djava.awt.headless=true -Djava.security.egd=file:/dev/./urandom'
ExecStart=/opt/tomcat/bin/startup.sh
ExecStop=/bin/kill -15 $MAINPID
User=tomcat
Group=tomcat
[Install]
WantedBy=multi-user.target
Install as well the security related program haveged, and make sure it starts at system boot together with Tomcat
yum install haveged
systemctl start haveged.service
systemctl enable haveged.service
systemctl start tomcat.service
systemctl enable tomcat.service
Add the exception on your firewall zone (trusted on my example) to access port 8080
firewall-cmd --zone=trusted --permanent --add-port=8080/tcp
firewall-cmd --reload
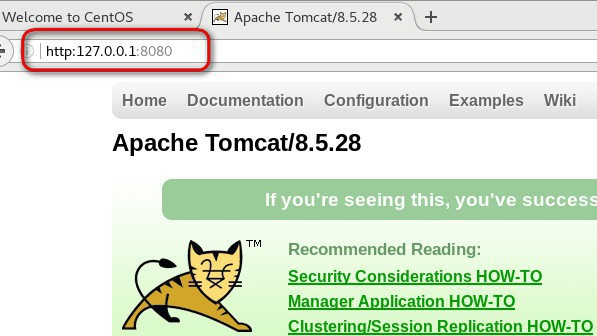
At this stage, you should be able to open Apache Tomcat from the loopback IP address at the CentOS server: http://127.0.0.1:8080

We still need to give access to the computers on your LAN to access the Apache Tomcat interface, which is what I need on my case
Visit the location /opt/tomcat/conf/ and either edit or create the file tomcat-users.xml as follows:
<role rolename="manager-gui"/>
<role rolename="manager"/>
<role rolename="manager-status"/>
<role rolename="manager-script"/>
<role rolename="manager-jmx"/>
<role rolename="admin-gui"/>
<role rolename="admin"/>
<user username="admin" password="password1" roles="manager-gui,manager,
manager-status,manager-script,manager-jmx,admin-gui,admin"/>
Visit the locations:
- /opt/tomcat/webapps/manager/META-INF/
- /opt/tomcat/webapps/host-manager/META-INF/
And modify the context.xml file in both location to be exactly the same, allowing access to you local LAN as well as the localhost
<Context antiResourceLocking="false" privileged="true" >
<Valve className="org.apache.catalina.valves.RemoteAddrValve"
allow="^.*$" />
<!--
<Valve className="org.apache.catalina.valves.RemoteAddrValve"
allow="127\.\d+\.\d+\.\d+|192\.\d+\.\d+\.\d+|::1|0:0:0:0:0:0:0:1" />
-->
</Context>

I the above screenshot, I'm giving full access to the 192.0.0.0 subnet
Hope this guide helps! If you have enjoyed reading this article about how to install Apache Tomcat on CentOS 7 you might like this other article of mine too!
- Install Squid, webmin and sent data to Splunk with CentOS 7 https://www.nazaudy.com/install-squid-webmin-and-sent-data-to-splunk-with-centos-7
London, 11 March 2018
References
- https://www.digitalocean.com/community/tutorials/how-to-setup-additional-entropy-for-cloud-servers-using-haveged
- https://www.vultr.com/docs/how-to-install-apache-tomcat-8-on-centos-7