How to create an offline copy of your Joomla 3 website
This guide gives the steps about how to create an offline copy of your Joomla 3 website. It is always nice to have an offline copy of your Joomla 3 website. This is how I've done it:
- Gather info from your website
- Version of PHP
- Location of your website on the host provider
- Version of Joomla 3
- Your PHP database name
- Setup a VM in VMware Workstation
- Install XAMPP
- Install Joomla!
- Method 1: Areeka Backup Manager
- Method 2: Manual restore
Tools to check and optimise your Joomla 3 website
Jump to this section if what you're doing is to copy a new version of Joomla 3
Recommendation: Download the Visual Studio Code from here: code.visualstudio.com, and use it as a replacement for Notepad. This tool is great to edit manifests and .xml files
Also, download and install 7-zip in your virtual machine, this software is a must! https://www.7-zip.org/download.html
1. Gather info from your website
From your live website, this is the info you need to know
- Version of PHP; Visit Plesk >> Websites and Domains >> PHP settings; at the time of writing this article I'm running 7.4.14
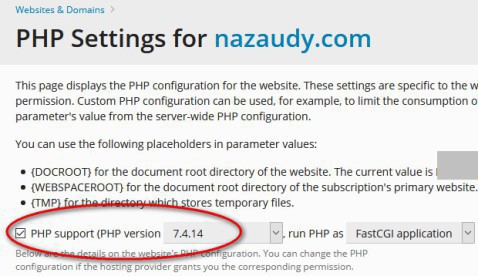
If you are using Cpanel, visit >> Databases >> phpMyAdmin to find out the PHP version that you are running
- Location of your website on the host provider; Still in Plesk, go to File Manager >> httpdocs >> and open the "user.ini" file and take note of the "open_basedir" location

- Version of Joomla; still in Plesk, go to Websites & Domains >> Applications and take note of the version of Joomla that you're running, 3.9.24 on my case
If you are using Cpanel >> Sofaculous Apps Installed >> Joomla and take note of the version installed
- Your PHP database name; go to your Jooomla >> System >> Global Configuration >> Server tab, and take note of the PHP database name, on my example is DBazXXX

If you are using Cpanel, visit Files >> File Manager >> public_html >> configuration.php and see the entry for "public $db
2. Setup a VM in VMware Workstation
Open the "Virtual Network Editor" of VMware Workstation and and take note of how you have configured the "Bridge Network". On my case I set it so that any virtual machine connected to VMnet5 will behave as if connected to the physical LAN of my house router
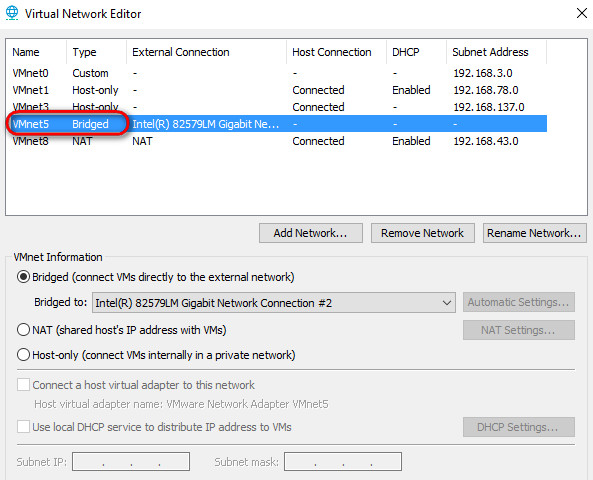
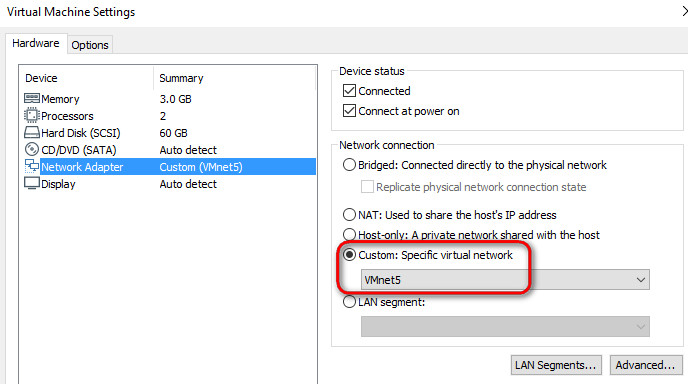
Given the fact that I'm hosting my Joomla on a Microsoft IIS server, I choose to replicate it by having also a Windows server. Create a Windows Server 2012 virtual machine on VMware Workstation, and make its network connection to be on "VMnet5, which on my case translate to "Bridge", hence the VM will have visibility to your local router
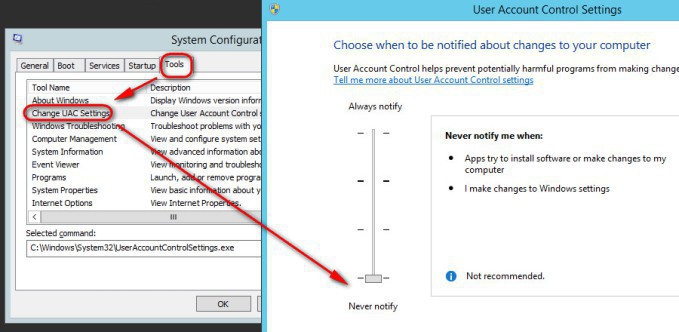
After the installation, run "msconfig" >> Tools >> Change UAC Settings and set it to "Never notify". We need the User Account Control to be off for our project. Remember to reboot the server after you have made this change
Then add a "100 GB" size to your VM, initialise it, format it and set it with the label D:\, this is the one that will host our website, matching the drive letter of our host provider
Finally, configure the "Shared Folders" option of your VM to "Always enabled", so that it can see your host, and map the drive to where you will save the backup of your website downloaded from Plesk
XAMPP is a wonderful distribution that contains all-in-one Apache, MySQL, PHP, etc, making it a lot easier to install a web by using XAMPP rather than by acquiring all separate components together. On your Windows VM, visit this link and download the version of XAMPP that has the same version number of PHP of your website, on my example 7.4.14 https://www.apachefriends.org/
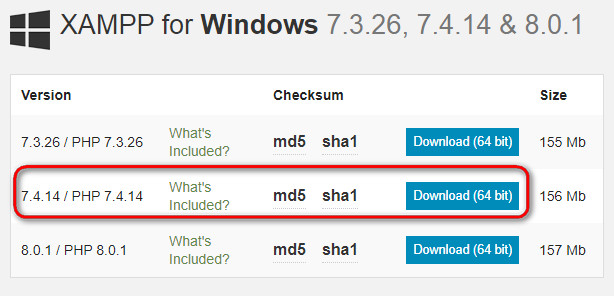
- Choose to install ALL components
- For the installation folder of XAMPP use D:\Domains
- After the installation, open the control panel and start both Apache and MySQL
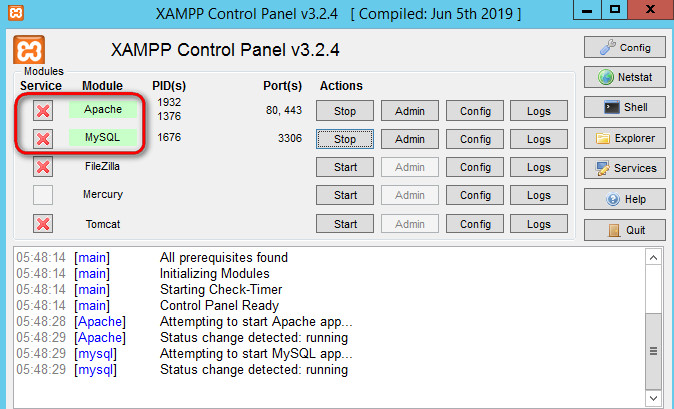
Click on the "Config" button and set these two services to auto-start

Finally, visit https://localhost/dashboard/ and you should be able to see XAMPP up and running
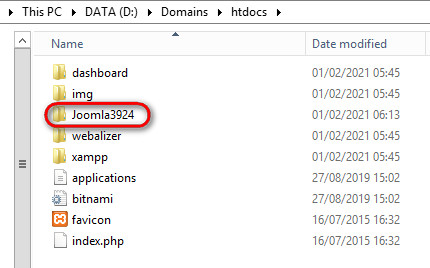
To continue this guide of How to create an offline copy of your Joomla 3 website, download now Joomla 3 from this link https://downloads.joomla.org/ ensuring that you download the same version that you have on your live website (on my example 3.9.24). Create a folder matching your Joomla version inside the httpdocs folder of XAMPP, we basically are going to have one Joomla 3 folder per version installed
Extract the contents of the previously downloaded zip file of Joomla into its appropriate version number
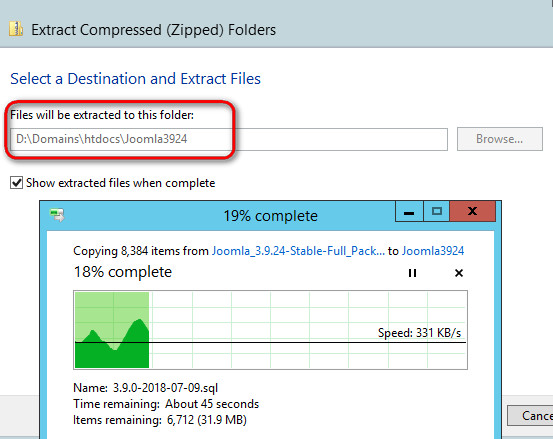
After the extraction, visit (or whichever the version number you installed) http://localhost/Joomla3924/ installation/index.php and fill in the details for the initial installation
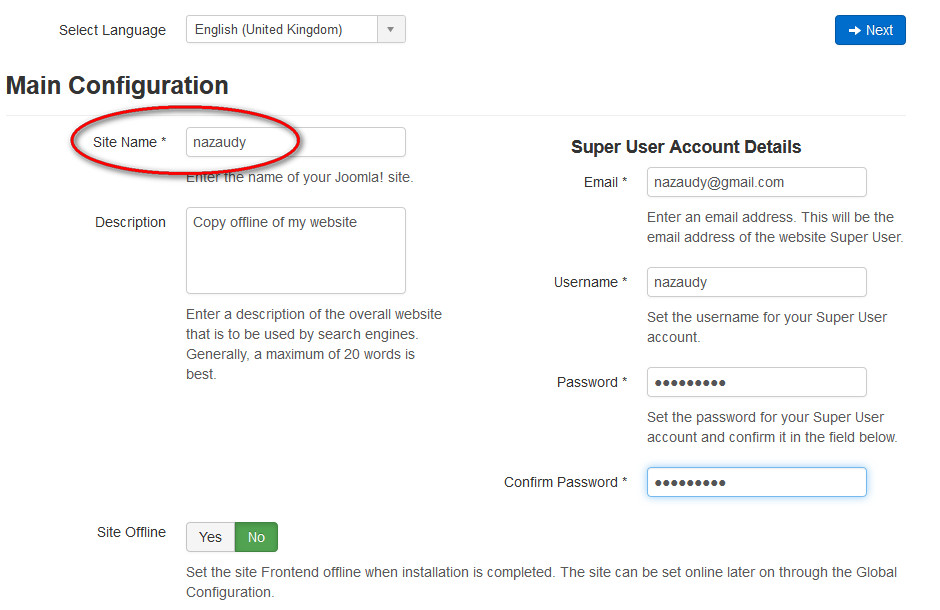
For the database page, enter the name of the database that you previously created, and use the username "root" with a blank password

Finally, on the overview page, choose to install "None" sample data and hit on the "Install" button
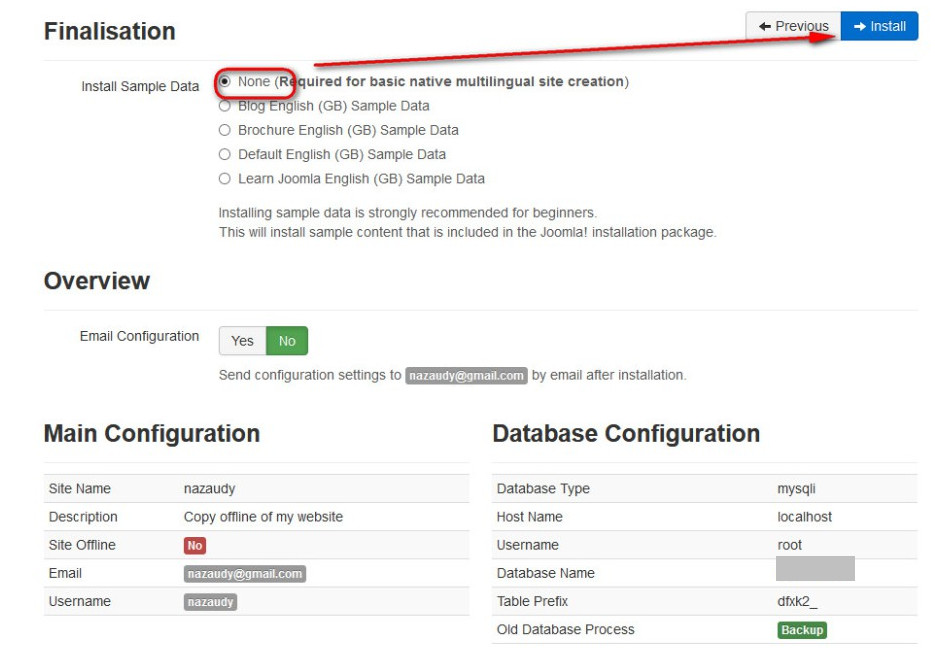
To be able to access the "Administrator" section, you need to first remove the "installation" folder

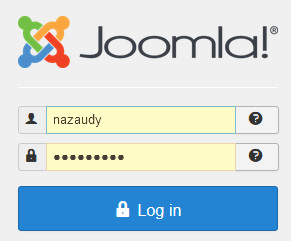
To ensure that everything works, logon to Joomla with the username/password that you created during the installation wizard
Method 1: Akeeba Backup Manager
Visit the Akeeba Backup forJoomla and download the Core component for your Joomla 3: https://www.akeeba.com/ . Install this component in both your "live" Joomla version and also on this "backup" Joomla version that we are running on XAMPP. The objective is to use Akeeba to make a full backup of our system and then download the file and restore it on our copy version of our website
Follow this excellent video to restore your site: https://www.akeeba.com/videos/1212-akeeba-backup/1618-abtc04-restore-site-new-server.html
Method 2: Manual restore
Before going any further, we need to create a PHP database to host our Joomla 3 site, so visit http://localhost/dashboard/ and click "phpMyAdmin" on the top-right corner. Once in there choose Databases >> Create database and enter the name of your PHP Joomla database that you gathered at the beginning of this article
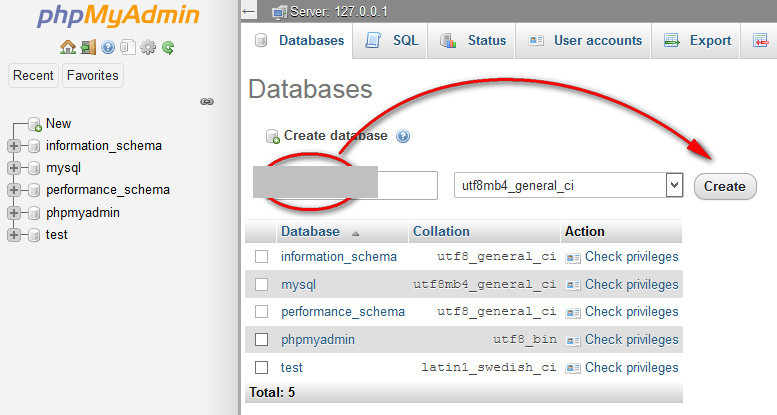
7. Restore a backup of your Live database
Use the "Backup Manager" utility within Plesk to create a FULL BACKUP of your website, and then download the zip file
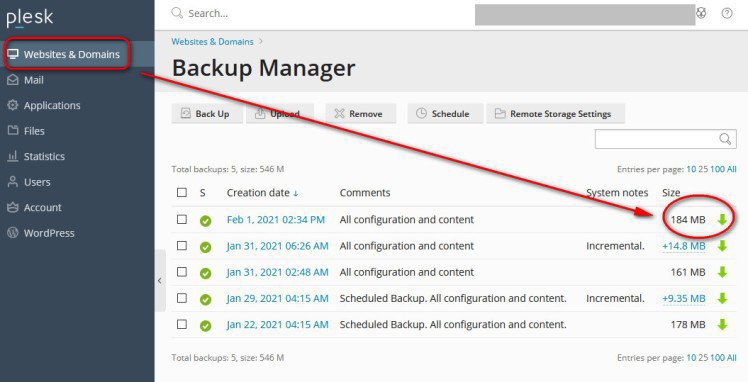
Locate the "sql dump database_name.sql" backup of the PHP database, and once you locate the file visit the phpMyAdmin on your localhost and choose to import that file on the PHP database, don't forget to select your database first before the import!

Leave all the other options for the import as default, and then click on "Go"

You can also access the phpMyAdmin console of your hosting website and choose the option to "Export" you current database to a file
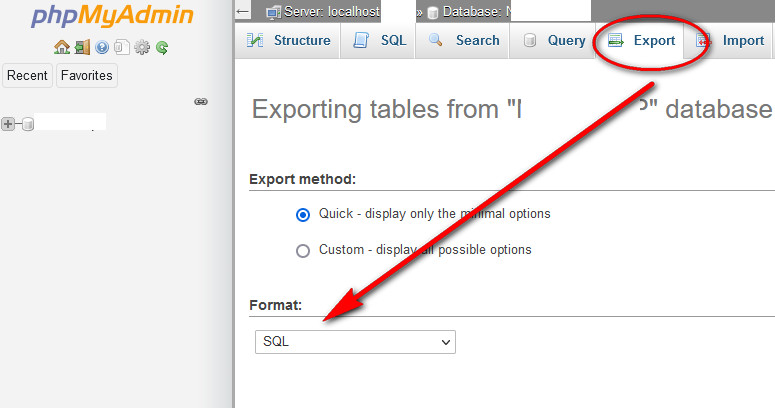
If you received the error message "You probably tried to upload a file that is too large. Please refer to documentation for a workaround for this limit", edit the "php.ini" file located in the D:\Domains\php folder and set the entries "max_execution_time", "max_input_time", "post_max_size" and "upload_max_filesize" to higher values. Then save the php.ini file and restart MySQL using the XAMPP console

If the import times out, edit also the entry
Look also on your Plesk backup for the "httpdocs" folder, and copy all of its contents and paste them into your "Joomla3924" folder, overwriting any files (replace the files in the destination) and effectively making your Live Joomla version offline
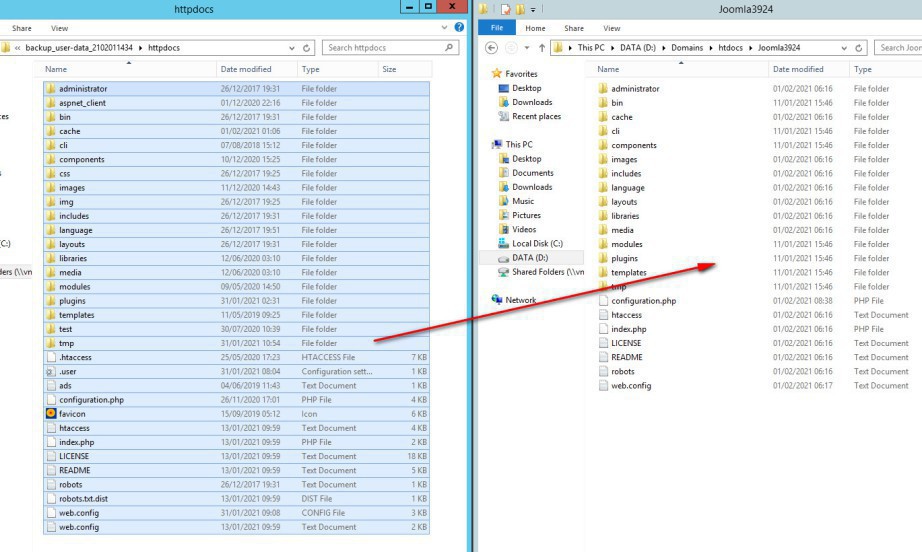
After you have copy/overwritten the files, open the "configuration.php" file (use Code Visual Studio, not notepad) from the root of the Joomla version folder, and carefully looks for the strings $log_path and $tmp_path and update them accordingly to your new offline location
BEFORE:
public $log_path = 'D:\\domains\\nazaudy.com\\httpdocs\\administrator/logs';
public $tmp_path = 'D:\\domains\\nazaudy.com\\httpdocs/tmp';
AFTER:
public $log_path = 'D:\\domains\\htdocs\\Joomla_3.9.24\\administrator/logs';
public $tmp_path = 'D:\\domains\\htdocs\\Joomla_3.9.24/tmp';
If you are using CPanel, change it like this:
BEFORE:
public $log_path = '/home/perfecth/public_html/administrator/logs';
public $tmp_path = '/home/perfecth/public_html/tmp';
AFTER:
public $log_path = '/htdocs/Joomla3918/administrator/logs';
public $tmp_path = '/htdocs/Joomla3918/tmp';
8. Update the PHP Database account
Still on the same "configuration.ini" file, look for the username and password of the account that is use to logon to the PHP database, it will look something like this:
public $user = 'MyDBUsername';
public $password = 'MySuperSecretPassword';
After you have taken note of the credentials, visit the phpMyAdmin console using your http://localhost/dashboard/ , select the DB of your site, choose the "Privileges" tab and create a new account in there (obviously with the same logon details) will ALL the privileges:
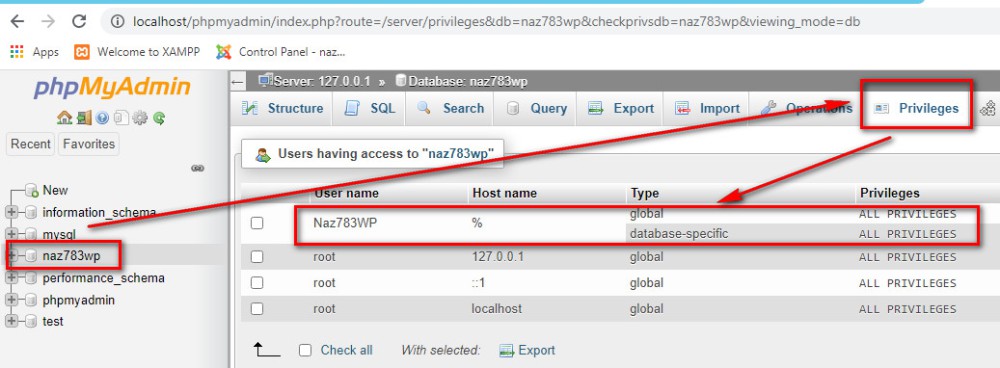
After making this update, you should be able to access an offline copy of your website by visiting: https://localhost/Joomla_3.9.24/
Enjoy it! :)
London, 17 May 2021
Tools to check and optimise your Joomla 3 website
- Test your structured data https://validator.schema.org/
- Rich Results Test https://search.google.com/test/rich-results
- Backlink Checker (to find out which domains are pointing to yours): https://ahrefs.com/backlink-checker
- Bing Content Removal Tool https://www.bing.com/webmasters/tools/contentremoval?src=help
- GTMetrix https://gtmetrix.com/
References
- Use Joomla! on your own computer https://docs.joomla.org/J2.5:Use_Joomla!_on_your_own_computer
- Tutorial Copying a Joomla! Website https://docs.joomla.org/Copying_a_Joomla_website
- Move your site to another server https://forum.joomla.org/viewtopic.php?t=187461
- Backup basics for a Joomla! Web Site https://docs.joomla.org/Backup_Basics_for_a_Joomla!_Web_Site
- The Ultimate Guide to using Tags in Joomla https://www.collectiveray.com/joomla-tags
- Joomla - The Ultimate SEO Checklist for 2021 https://www.web-eau.net/blog/joomla-seo-checklist
- Increase phpMyAdmin upload limit https://www.trickspanda.com/increase-phpmyadmin-upload-limit/