NetApp simulator 9.6 Installation and Configuration
This guide explains the steps to follow for a NetApp simulator 9.6 Installation and Configuration so you can test NetApp commands in your private environment
But first, let me tell you that if you happen to have a NetApp filer FAS2552 in your environment, I recommend you to upgrade to ONTAP version 9.6 P5, specially if you have CIFS volumes servicing iMacs, like we do. For months our users were reporting horrible things, more appropriate of Halloween movies than of a working environment with NetApp + CIFS + iMacs, things like suddenly they were given access denied to folders on our CIFS volumes, and found themselves unable to save their work from their iMacs. This behaviour of the NetApp was totally random and we spent lots of time trying to find what the problem was. Created a couple of tickets with NetApp support, and though they were good and helpful, they use the good-old Help Desk technique called "overload the user with as many request as you can", requesting logs and logs and more logs, with their goal seems to be to ensure the ticket was always on our-side and not on theirs. NetApp support will always ask for these question whenever a ticket is created, not matter how well you describe the problem, so have your answers for these prepare:
- Is there any data loss or data available?
- Which application or business function is affected?
- How are the end-users currently affected?
In addition, and probably after your answer the 3 queries above, they'll bomb you with yet more questions not matter how many screenshots you send them of the issue, it seems they want you to explain your problem in their way, with little effort from their part in first of all reading your input
- What is the protocol used – NFS or CIFS; what version
- What is the name of the vserver, volume
- What is the LIF IP address
- What is the client IP address
Anyway, that's just my experience with NetApp support, hopefully yours will be different and perhaps better. Digging and digging we happened to find out this article (you'll need NetApp credentials to see it) titled "Bug: 914483: Intermittent access due to credential cache having incomplete credentials" https://mysupport.netapp.com/NOW/cgi-bin/bol?Type=Detail&Display=914483

This problem absolutely went away and disappear completed once we upgraded from 9.6 P1 to ONTAP 9.6 P5, and I wonder... why the issue was fixed on 9.5 P11 (as shown on the screenshot above) but was still present on 9.6 P1? And, most important and annoying, why did we have to find out this ourself? NetApp support, in spite of their good intentions, were pretty much useless. One more important thing we did that resulted on this problem vanishing into thin air, was to "Disable Directory caching" on our iMacs fleet as per described on this Apple support KB https://support.apple.com/en-gb/HT208209 After that, the performance of the CIFS share on Netapp improved. More info about customising SMB protocol for CIFS here: https://support.apple.com/en-gb/HT212277
sudo vi etc/nsbm.conf
[default]
dir_cache_off=yes
Have said of all, and take it all out of my chest, let's go ahead and install & configure the NetApp 9.6 simulator for VMware Workstation
- What you will need
- Download the Simulator
- Starting the simulator in VMware Workstation
- Turn off LOGGING, AUTOSUPPORT and set NTP
- Increase space for the root Aggregate
- Turn off SNAPSHOT policies
- Add CIFS and NFS licenses
- Create data aggregate
- Create a Storage Virtual Machine (SVM) and configure CIFS / NFS
- Create Volumes for CIFS
- Add NetApp to Shared Folders console
- Create a Qtree export policy
- Create a Qtree
- Create folders for users
- Create Quotas per individual users
- Check the access on a client workstation
To get started with the simulator, you will need a copy of WMware Workstation installed on your computer, version 15 is the one I'm using You can get a free trial key from piratebay.. sorry! I meant from here: https://www.vmware.com/ You also need to setup on your test environment a Domain Controller, that would be use for NetApp authentication. This is how a configure my test lab, so you can have an idea:
- A domain controller VM with the IP 192.168.70.101
Now that you are there, in DNS, you may as well create an entry for our NetAppX, to be 192.168.80, that's the IP that will serve CIFS shares
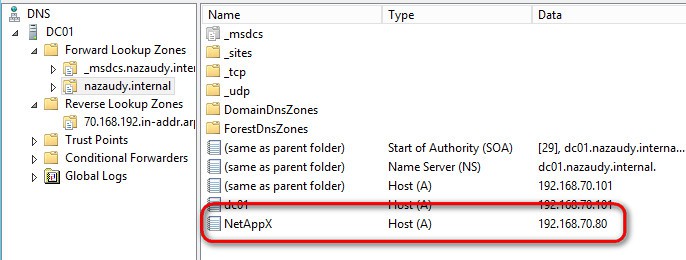
And one last thing before jumping into the Simulator, please ensure that you have turn off the firewall on your Domain Controller, once you got it ready, else we might find SMB issues later on when trying to chit-chat to the Simulator

Using your NetApp account, logon to their portal on this link : https://mysupport.netapp.com/api/ and once you're there visit "Downloads" and type "Simulator" on the search field to find the Simulate App

Tick the bit "I have read the End User License Agreement" blah blah and Accept & Continue, then download all the bits related to "Simulate 9.6"

3. Starting the Simulator in VMware Workstation
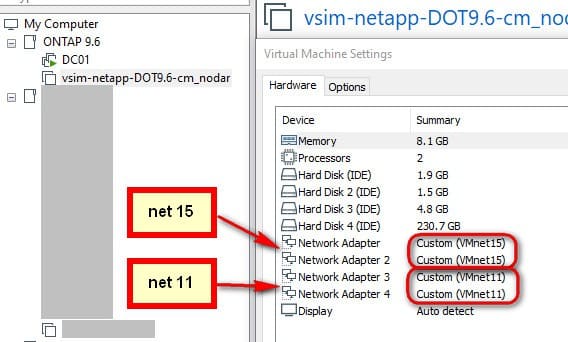
Fire up VMware Workstation >> File >> Open and choose the .ova file you've just downloaded, that will load the VM on your Workstation. I've altered the default setting and gave a generous 8GB of ram rather than the 5GB it comes by default. Also changed the network adapter location to totally isolated network on my virtual environment. Do notice please the DC01 virtual machine just above the 9.6 simulator, that is the Domain Controller that you would need to properly configure NetApp and simulated to be on a real environment. For the record, the domain I created was "nazaudy.internal", avoid using the suffix *.local for your domain, that is used by default by Macintosh and may conflict in on your real environment you have iMacs, and is connected to net 11
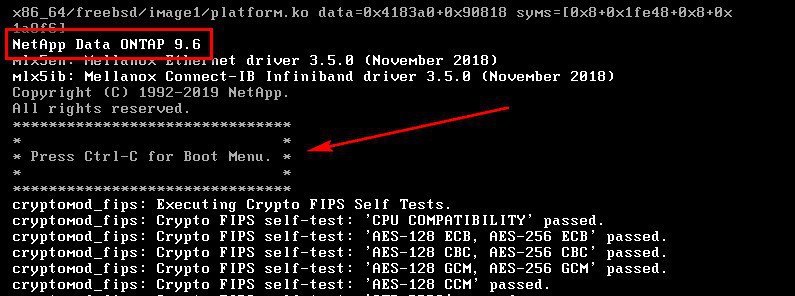
Turn of the VM, and when you see the "Ctrl-C" message, do press it to go to the boot menu, otherwise the system will boot continuously for the next 2 billion years, until the Sun dies, waiting for you to start the configuration
Once on the boot menu, hold your breath and press option 4, "Clean configuration and initialize all disks"
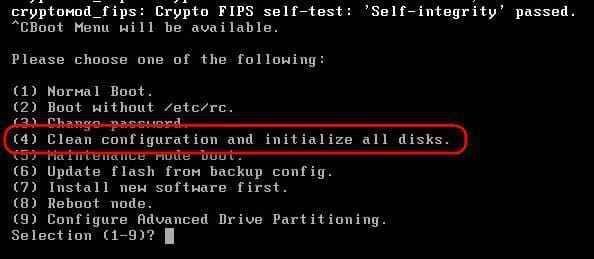
To the questions:
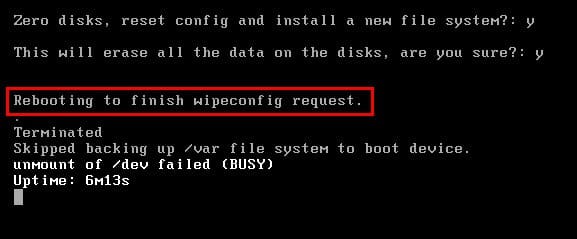
- Zero disks, reset config and install a new file system? : [do press Y]
- This will erase all the data on the disks, are you sure?: [be persistent in live, and do press Y again]
The system will wisely reboot to finish the wipeconfig request. This time, let it boot normally and do its job
Once the wiping of the config is all over, NetApp will ask you to confirm the enabling of AutoSupport. We'll disabled it later but for now just say "yes". When asked to configure the node interface, do it as follows:
- Node Management interface [e0c] = set it to 192.168.70.119

After that, your DC should be able to ping now to that IP address (maybe check it?). Then press enter and type "create" to give birth to a brand new shiny cluster

Next, Type "no" for Single Cluster; then type "yes" to accept the defaults

You'd be kindly asked to create a new password for the admin account, I used "Simulator7!".

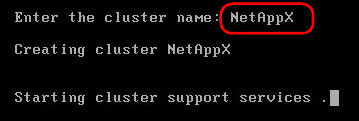
Enter the cluster name “NetAppX”, press enter then, go and get a quick cup of coffee while the does its magic
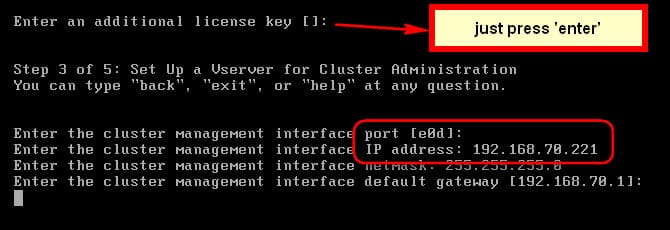
Next, press enter to to skip the license, we'll add it later using the GUI. (we’ll do it later). When asked to configure the cluster interface, do it as follows:
- Cluster Management interface [e0d] = set it to 192.168.70.121
Finally, enter the details of your Domain Controller, following by a location of your choice of where the unit can be found, e.g. London

And that would be it, you'll be prompt it to logon, meaning it is time to us to jump to the GUI interface and do the remaining work form there

4. Turn off LOGGING, AUTOSUPPORT and set NTP
Visit the cluster IP address and logon with the previously created password. Once you're there, click on the "dented" wheel >> General and turn off the logging service and set the time out to 180; this will prevent the hard drive of the NetApp Simulator from getting full and will allow us to work without having to logon to the console every now and then
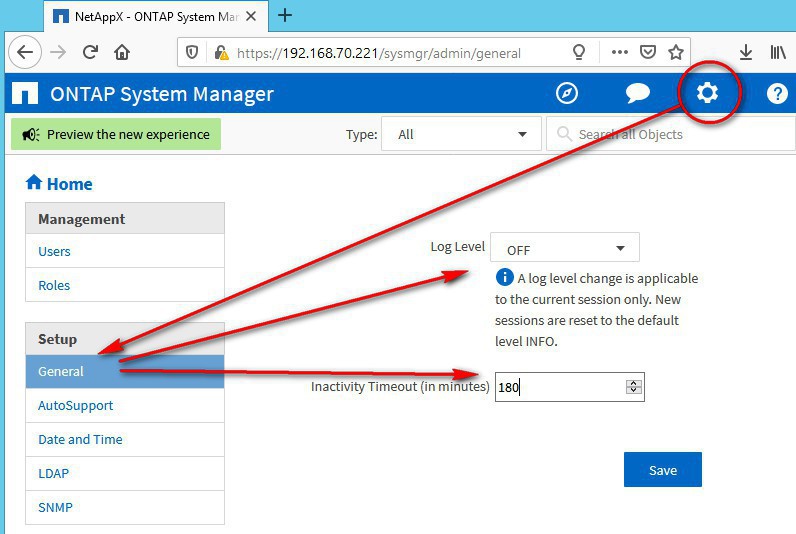
For the above screenshot... remember to click "Save"!
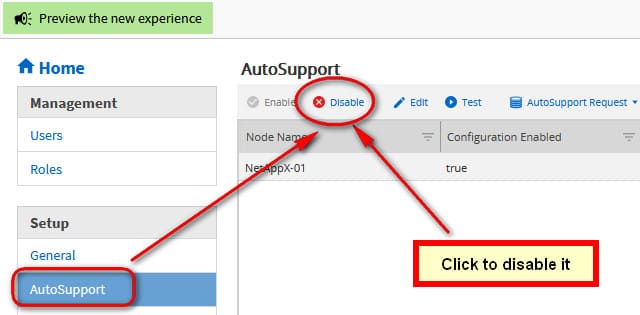
Visit the "AutoSupport" section and disable it, unless you're doing some tests with it, we really don't need it on the simulator; one less service to worry about
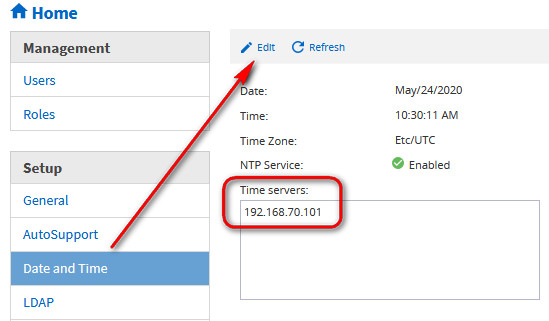
Visit now the "Date and Time" section, and configure the IP address of your Forest Root Domain controller, which should have the PDC role thus giving accurate time to your Netapp, to sync perfectly with the DC for authentication of users
5. Increase space for the root Aggregate
Just before jumping into the next cup of coffee, it is imperative that we increase the space that "aggr0" is delivered by default, otherwise our lovely simulator will soon collapse in the physics of not available space. Go to the homepage of the Simulator and navigate to Storage >>> Aggregates & Disks >> and edit the aggregate 0 by visiting More Actions >>>> Add Capacity; notice that the space is already 95% and we have done nothing!
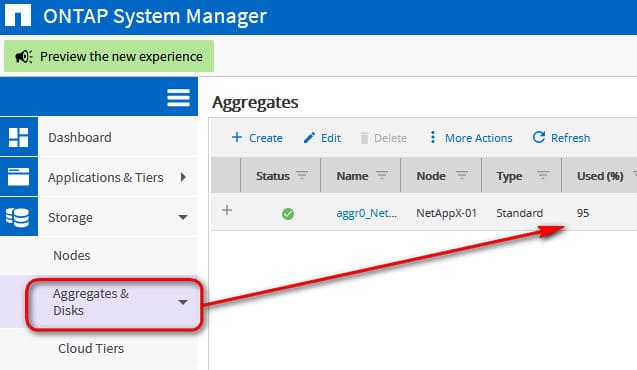
Increase the capacity by adding 4 hard drives, that should be enough to keep us going for whichever tests we want to do
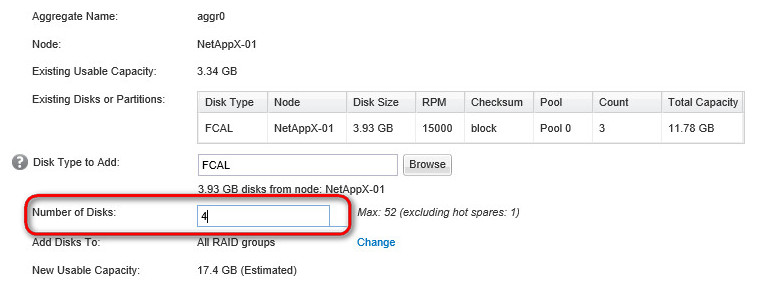
If you find there is none disk to add, please refer to the Troubleshooting section, at the bottom of this article
Go back home and in a minute or so you'll see that now the root aggregate looks a lot better

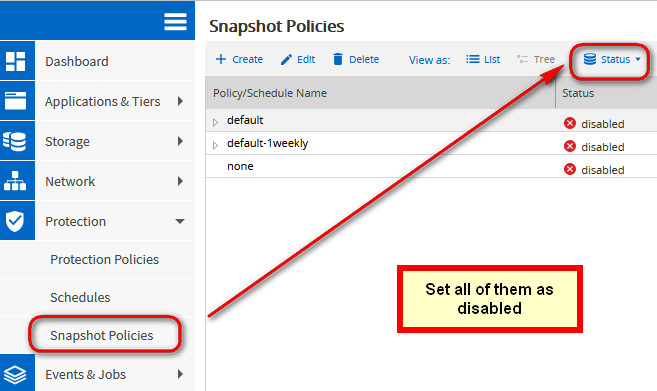
If you don't want to run out of space on our simulator, visit Protection >>> Snapshot policies and turn all of them off
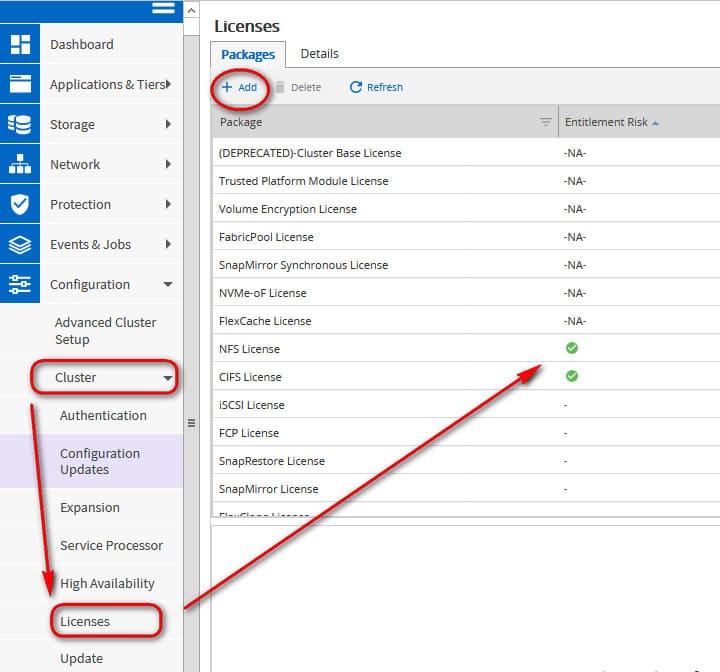
Visit Configuration >>> Cluster >>> Licenses and add the following licenses so we can test CIFS and NFS shares:
- NFS license: MBXNQRRRYVHXCFABGAAAAAAAAAAA
- CIFS license: YVUCRRRRYVHXCFABGAAAAAAAAAAA
Visit the Storage >> Aggregates section again and click on "Create", then ensure that you set the "Manually Create Aggregate" to on, and set the settings as below (it should show a total of 20 disks, else ensure you've assigned all of them to the node):

Click on Submit, and you're done! Happy go lucky we'd have end up with these lovely aggregates:

9. Create a Storage Virtual Machine (SVM) and configure CIFS / NFS
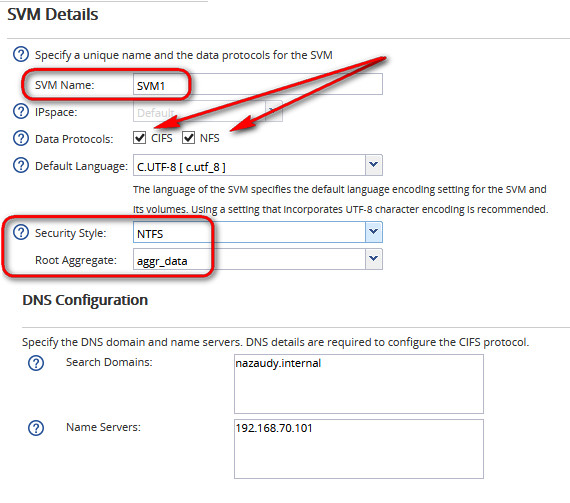
Visit Storage >>> SVMs and create a new Storage Virtual Machine called “SVM1” with the security style of NTFS, ensuring that you select the Data Protocols to be CIFS and NFS, then click "Submit & Continue"
ON the next window, select 192.168.70.80 as the IP address for the management of the CIFS, and enter the detail to join the NetApp to AD, but do not click on "Submit & Continue" just yet
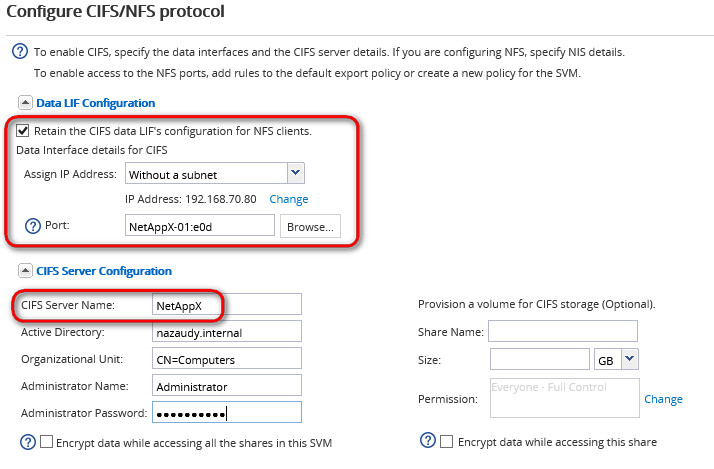
Important !!!: before you click on "Submit & Continue" to create the CIFS share, open the clock in your AD, and move it forward one hour! Trust me, it will work. I've explained why we need to do this on the troubleshooting section, at the bottom of this article
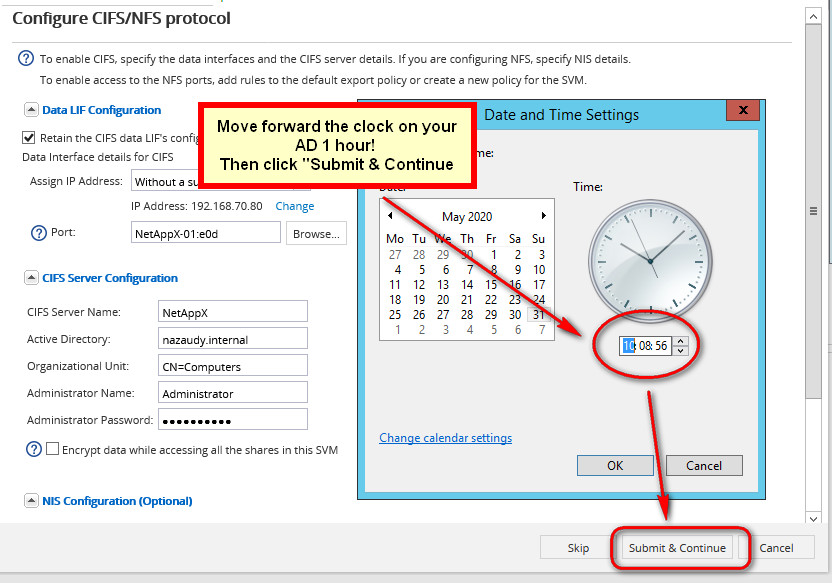
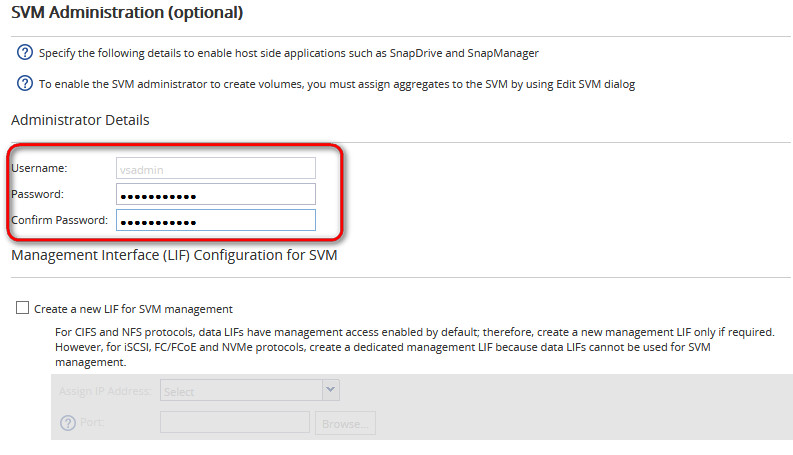
Once the time is adjusted, the creation of the CIFS will complete successfully. For the next window, enter our Administrator password (Simulator7!) for the vsadmin account and that's it, we are finally done!
Take a look at "Network Interfaces" and verity that our selected IP address of 192.168.70.80 is configured to service CIFS

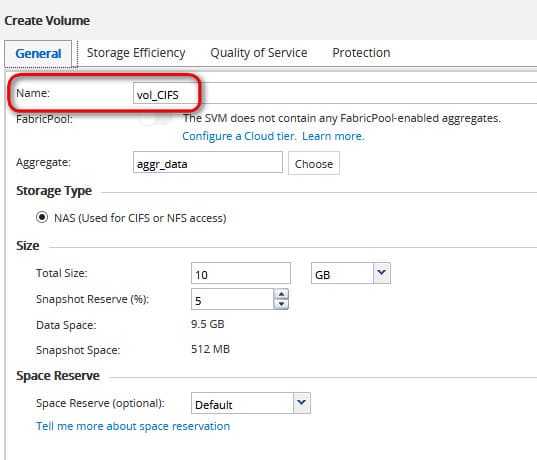
Visit Storage >> Volumes >> and click to create a new "FlexVol" volume; give it 10GB total size to start with
11. Add NetApp to Shared Folders console
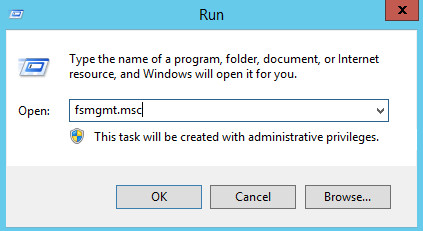
On your DC, you can open MMC and add the "Shared Folders" console, we'll use it to connect to the NetApp and managed the CIFS shares. A cool way to start this console is by running "fsmgmt.msc" from the Run command, though it is better if you open it using the MMC console, as it gives you the option to save it later
Use the console to create and populate the Shares as you see it fit

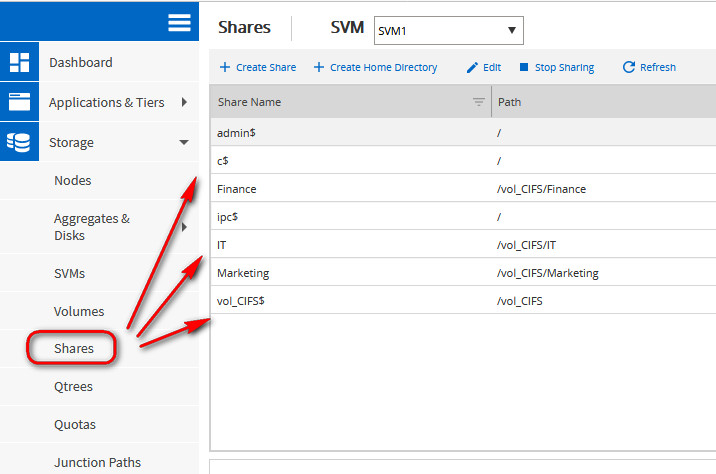
Once you've done that, you'll see an new entry for "Shares" under the NetApp GUI Management console
12. Create a Qtree export policy
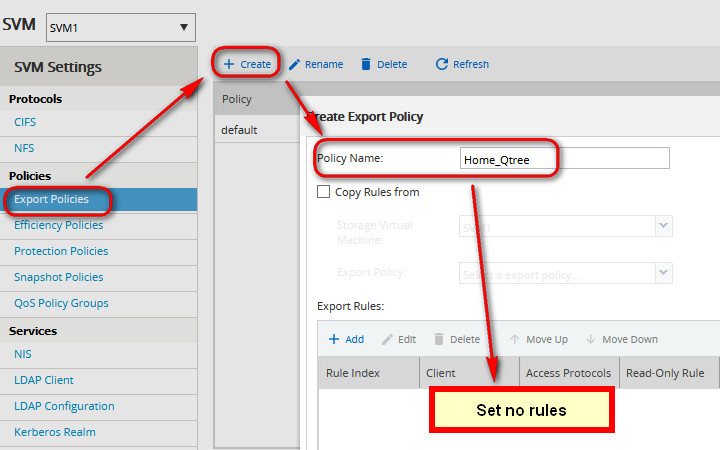
We need a 'blank' export qtree policy, so please edit the SVM1 settings >> CIFS >> Export Policies and create one, mine I called "Home_Qtree"
Visit the Qtree section and create a new "Home_Qtree" that points to "vol_CIFS", this will effectively create a folder on that root volumes where quotas can be applied. Choose NTSF as the security setting and our previously created export policy as target
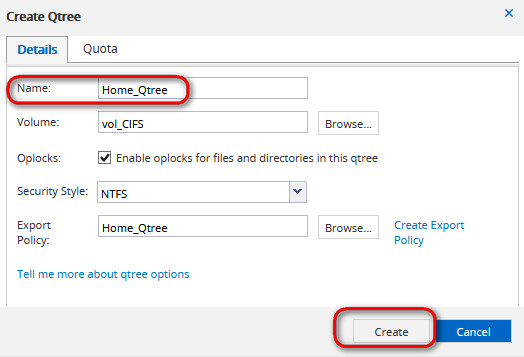
To the gentle warning message: "The export policy 'Home_Qtree' does not contain any rules. Therefore, the qtree associated with the policy will be inaccessible. Do you want to continue?", do follow your instinct and yes, press Continue

Using the Shared Folders console, expand the vol_CIFS >> Home_Qtree >> and create in there the relevant folder for individual users. Please refer to my oher article about how to properly configure those folders for share among a production network: https://www.nazaudy.com/index.php/13-technology/microsoft/32-windows-10-management-tips

Don't forget to share all the folder of each user with the dollar sign ( $ ) so that it is hidden; share it with Everyone = Full Access

15. Create Quotas per individual user
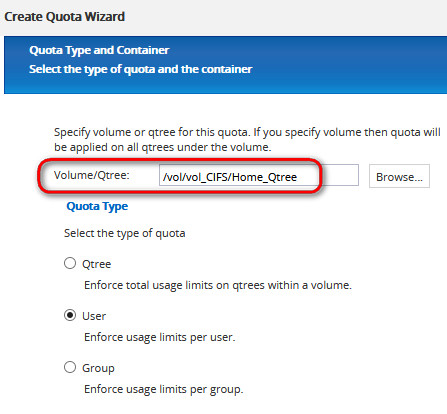
Go to the NetApp GUI Storage >> Quotas and start the wizard to create a new quota always pointing to "Home_Qtree" (where the quota will be applied) and selecting "User" as the type of quota
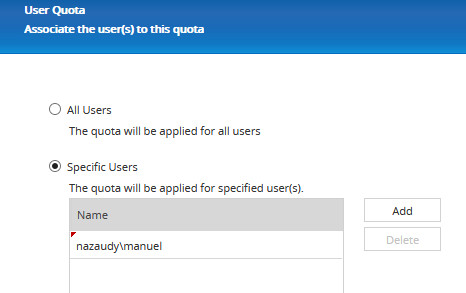
On the next window, type the name of the user that his quota will be applied to... yep, you guess it: you'll need to create a quote per user.. oh dear
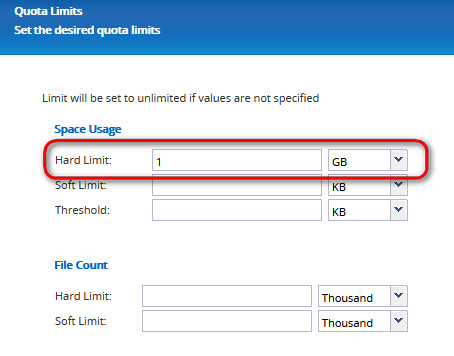
Start by given them 1GB of hard quota, of course
16. Check the access on a client workstation
Logon with the user to a client of the domain, and start mapping drives,
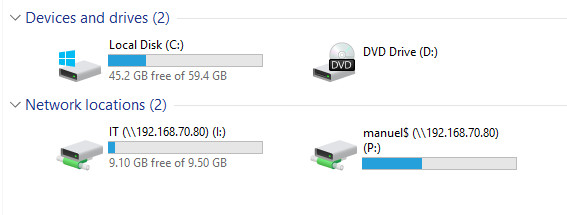
And remember that, if you move files under your admin account on behalf of the user, those files size will count under your account; reset the owernership if the user are once you've finished moving their stuff
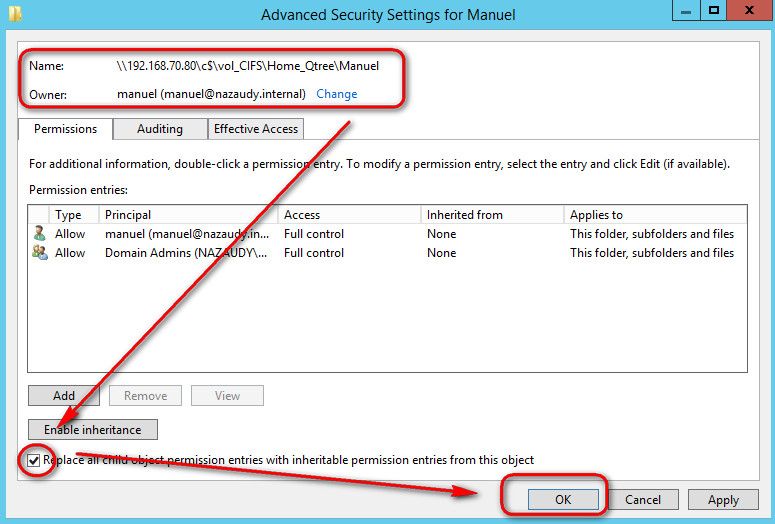
I think this is all, do play around with the Simulator with whichever other are you want to test!
Good luck and thanks for reading! If you have enjoyed this article about NetApp simulator 9.6 Installation and Configuration, you might like this other one too:
- NetApp upgrade to ONTAP 9.x https://www.nazaudy.com/netapp-upgrade-to-ontap-9-x
London, 31 May 2020
References
- https://library.netapp.com/ecmdocs/ECMLP2602646/html/GUID-79310F6A-901F-482F-AB2A-DEC4312488FB.html
- https://library.netapp.com/ecmdocs/ECMP1368852/html/GUID-48AD434D-433B-4208-8D9E-C3696707E20C.html
- https://support.microfocus.com/kb/doc.php?id=7023054
- https://docs.netapp.com/ontap-9/index.jsp?topic=%2Fcom.netapp.doc.pow-cifs-cg%2FGUID-5AE3CADE-5EF1-403B-A664-2DEA9F13B0C8.html
Troubleshooting
Yep, I spent hours trying to work out this error message which shows up at the time of joining the NetApp to the DC:
"ONTAP API Failed: Failed to create the Active Directory machine account "NETAPPX". Reason: SecD Error: no server available Details: Error: Machine account creation procedure failed [ 48] Loaded the preliminary configuration. [ 72] Created a machine account in the domain [ 73] Successfully connected to ip 192.168.70.101, port 445 using TCP [ 76] Encountered NT error (NT_STATUS_MORE_PROCESSING_REQUIRED) for SMB command SessionSetup [ 76] Cluster and Domain Controller times differ by more than the configured clock skew (KRB5KRB_AP_ERR_SKEW) [ 76] Kerberos authentication failed with result: 7537. [ 81] Encountered NT error (NT_STATUS_MORE_PROCESSING_REQUIRED) for SMB command SessionSetup [ 82] Cluster and Domain Controller times differ by more than the configured clock skew (KRB5KRB_AP_ERR_SKEW) [ 82] Kerberos authentication failed with result: 7537. [ 83] Unable to connect to LSA service on dc01.nazaudy.internal (Error: RESULT_ERROR_KERBEROS_SKEW) [ 83] No servers available for MS_LSA, vserver: 7, domain: nazaudy.internal. **[ 83] FAILURE: Unable to make a connection ** (LSA:NAZAUDY.INTERNAL), result: 6940 [ 83] Could not find Windows SID 'S-1-5-21-3810212460-1990748983-3526540209-512' . (Error: 13001)"

Clearly, the message says that the time between NetApp and DC is wrong, and not matter how much I checked both had exactly the same time.... bullshit, Netapp Simulator lies. The minute I added an extra hour to the DC, I was able to join the NetApp to it successfully, so go and figure why this happens, but the "date" command is not showing the realtiime on the NetApp
Believe me, I run on the NetApp CLI the following: >> timezone -timezone Europe/London so that the NetApp is forward one hour and I don't need to change the time on AD, but it didn't work. I think this might be a bug in the simulator, si somebody come across a solution to this please share it, I'd love to know!
Assign disks to node
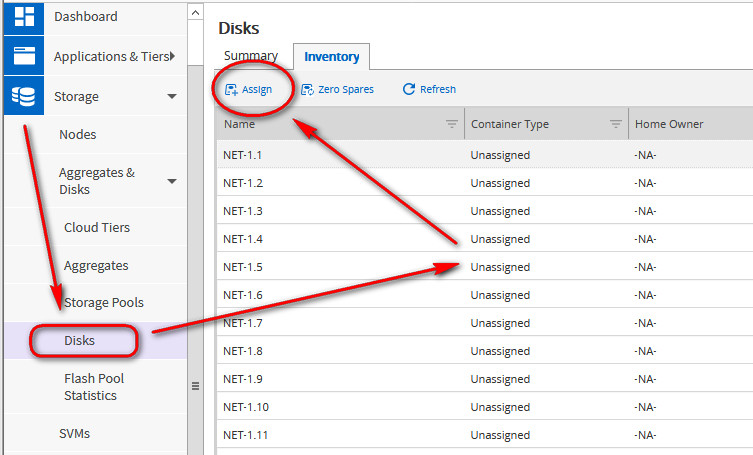
The NetApp Simulator 9.6 comes with 14 hard drives of 1TB each that are marked as "spare". In order to used them, we need to assign them to our node, to do that visit Storage >>> Aggregates & Disks >>> Disks and on the "Inventory" tab, select each one of the disk market as "spare" and click on "Assign"
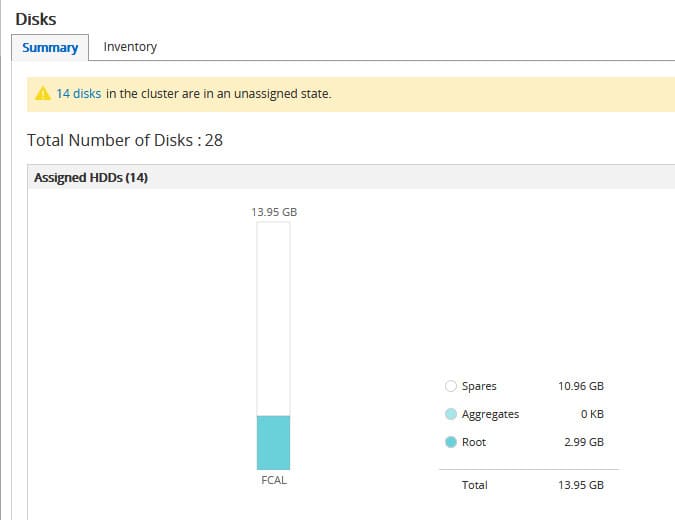
Assign all of the spare drives to our "NetAppX-01" node, so we can use them, and ensure you "refresh" the page after each assignment so the changes are reflected
